


Easing up the process of Tensorflow 2.0 Object Detection API and TensorRT
Last Updated on January 6, 2023 by Editorial Team
Author(s): Abhishek Annamraju
Computer Vision
Detailed steps to train your own object detector with Monk’s TF-Object-Detection-API, optimize using TensorRT and run inference on GPU systems
The entire code is available as a jupyter notebook at Monk Object Detection Library
Every computer vision engineer takes up an opensource library with the goal of using it on a custom dataset. And one of the most used libraries for object detection is Tensorflow for its ever-expanding model zoo. Tensorflow recently added support of TF 2.0 for Object Detection API. Using TensorFlow object detection API for custom object detection and further model optimization using TensorRT is a lengthy time-consuming process and prone to errors.
To overcome the issues that are usually faced and to reduce the workload on the developer
* modifying tfrecord examples and arranging data in rigid formats to fit in custom data
* updating config files
* using the right files to train the engine
* converting trained checkpoints to other formats for inferencing
* searching for right ways to run inference
* optimizing the model using TensorRT, etc
we integrated TF object detection API with a low-code monk AI toolkit
With it, developers can easily
★ convert custom datasets to tf-records
★ update config files using pythonic syntax
★ train the engine and export to different inference formats
★ Infer either using checkpoints or saved model formats
★ Optimize model using TensorRT engines for faster inference
Issues faced while training a custom dataset using TF 2.0 Object Detection API
Along with the procedural steps, mentioned are the issues a developer or a researcher usually faces and why we thought of easing up the process using a low-code opensource library.
Step 1: Installing prerequisites and compiling models.
* Training with older versions 2.0.0 and 2.1.0 resulted in error
AttributeError: module ‘tensorflow_core.keras.utils’ has no attribute ‘register_keras_serializable’
* Training with version 2.2.0 also resulted in the following errors
AttributeError: 'CollectiveAllReduceExtended' object has no attribute '_cfer_fn_cache'
* Version 2.3.0 runs without any errors and is compatible with colab too.
Hence V-2.3.0 was selected, soon upgrade to V2.4.0 will be done as soon as it is released as tf-lite conversion is error-prone in V-2.3.0
Step 2: Dataset settings
* TF model’s dataset_tools provide examples for public datasets such as COCO, VOC, OID, etc; But not all public datasets are annotated in these formats.
* Once annotated in this format, it needs to be arranged in a data structure that can be fed into the files present in object_detection/dataset_tools/; Or these files are to be modified to ingest custom data in the pipeline
To make this process easier, we added a simple parser to convert annotations to VOC format data and further to tfrecords.
Step 3: Model and Config file + Train
* Weights and config files have to be downloaded from the Model zoo, and data structure to be updated in this format
* Post this, the config file elements have to be updated. A set of more than 25 elements have to be changed including — dataset details, base feature extraction details, checkpoint details, optimizer details, tf-record details.
* Once config details are updated training can be done
To avoid manual changes to config files and folder structure formats pythonic API wrapper was created.
Step 4: Export Model to saved-model format and inference
* Checkpoint files then can be converted to the “Saved Model” format.
* General issues here include conversion of ssd fpn and resnet formats.
* Running inference on checkpoint files required object detection model builders whereas saved model “.pb” formats can be loaded using tf’s load_model function.
* Creating a graph function over saved_model before running inference usually tends to speed up the process
Step 5: TensorRT model conversion and inference
* Saved model can then be optimized to run on different NVidia GPU machine
* The issue with TensorRT is that the library version for the development system (one where you train and convert the model) and the deployment system (one where you deploy your model) has to be the same.
* * The next issue with TRT is that it optimizes the model based on the compute compatibility of the model being used. In simple terms, a model optimized on colab cannot run on the Jetson Nano board. Hence a model needs to be just converted and built on runtime on the deployment machine.
* TensorRT models can be converted only from saved_model (“.pb”) files and it generates an optimized model in a similar format which then needs to be inferred on.
Let’s Get Started with the process
Note: Entire code is available as a jupyter notebook at Monk Object Detection Library. Here, I have mentioned only the important steps involved in the entire work.
Step 1 — Installation
For local or cloud-based systems:
This will install
* Pre-requisite libraries such as numpy, scipy, opencv, pillow, lxml, etc
* Tensorflow 2.3.0 and Tensorflow-models-python-2.2.0
* Tensorflow Object Detection API
Similarly, it can also be installed on colab
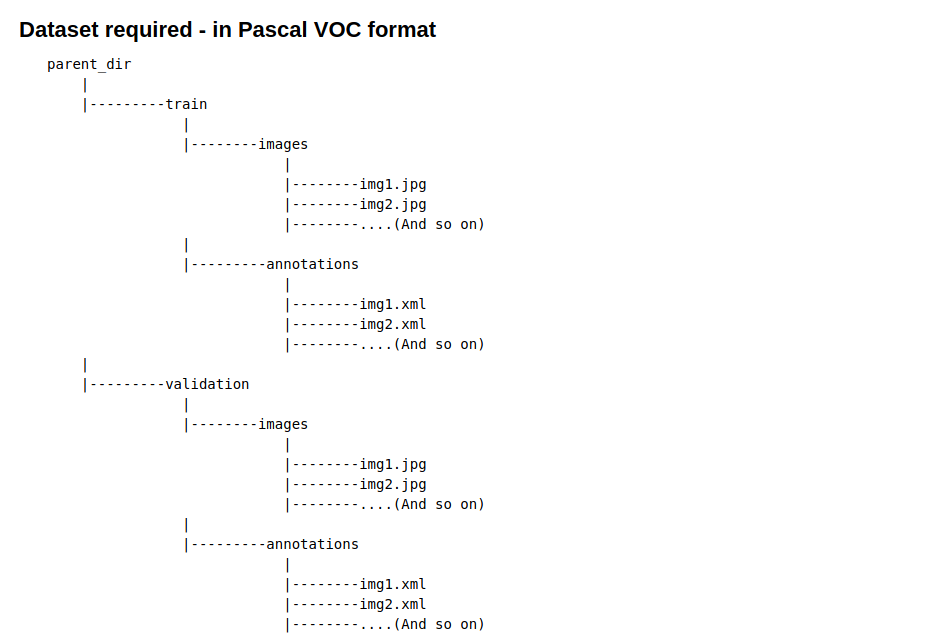
Step 2 — Data preparation
The dataset needs to be in simple pascal VOC format as mentioned below
To convert your dataset from COCO or any other format check these detailed tutorials
For this tutorial, we used the BDD100K on-road object detection dataset — Credits
Complete steps to download the data and convert it to Pascal VOC format are mentioned in this jupyter notebook on Github
Step 3 — System parametric setup
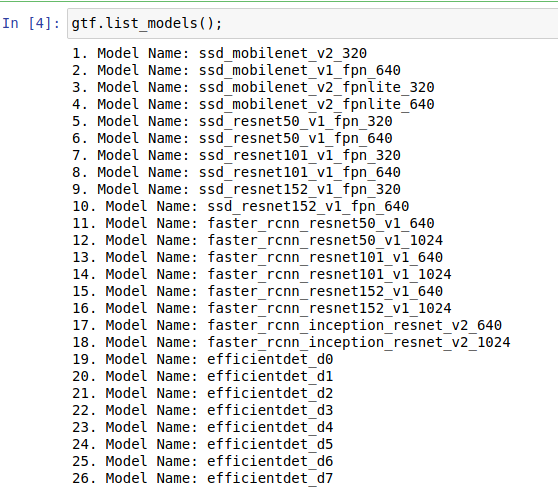
★ Load the detector
★ List all the models. At present 26 different models are supported
★ Set training and validation data with params
* Set batch size as per the GPU memory available. A size of 24 fits well on AWS p3.2x instance with V100 GPU (16 GB VRAM)
★ Create TF Record!!!
* Batch size, number of classes, tf_record details all will be saved automatically in the config file
★ Select a model from model list
* For this example we have selected SSD Resnet50 with Feature Pyramid network and it takes input image of shape 640x604x3 (RGB image)
★ Set all other hyperparameters
* Set training steps — an ideal value would be to train for 100K steps for large datasets
* Optimal initial learning rate for all models can be set around 0.01, whereas ssd_mobilenet_v2 and faster_rcnn_inception models can take up even higher learning rates.
★ Set output inference graph path and TensorRT params
* TensorRT optimization is optional
* TensorRT optimization supports 3 types of optimizations — FP32, FP16, INT8
* Floating-point quantizations are useful for boards like Jetson Nano.
* INT8 optimization builds at the time of creation while the other two build on the deployment machine. Build can be easily considered as actual optimization being done on the model. An issue mentioned above with TensorRT is that it should be built on a machine where you want to deploy it, or should be built on a machine with the same TensorRT library and Cuda compute capabilities.
* Hence, it is advised to run INT8 optimization on the deployment machine itself.
* Since, for this example, we trained and ran inference on AWS P3.2x instance, we went for INT8 quantization.
Step 4— Training and model export
★ To train run the following command.
* Since it runs a TF engine, running it as a wrapper on jupyter notebook results in system exit.
* For that reason, a script named train.py is provided.
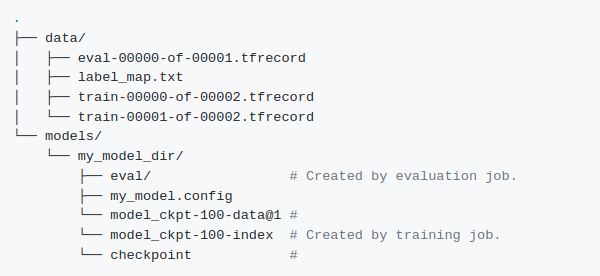
* Once training is completed, checkpoint files will be saved in the output_directory that you have mentioned in the hyperparameter setup command.
★ To export the trained model to saved_model (“.pb”) format run the following command.
* Since it runs a TF engine, running it as a wrapper on jupyter notebook results in system exit.
* For that reason a script named export.py is provided.
* Output .pb file will be saved in the export_directory that you have set in export_params setup command.
Step 5 — Inference and speed benchmark before optimization
★ Load the detector
★ Load the trained model
* Load form saved_model in exported directory
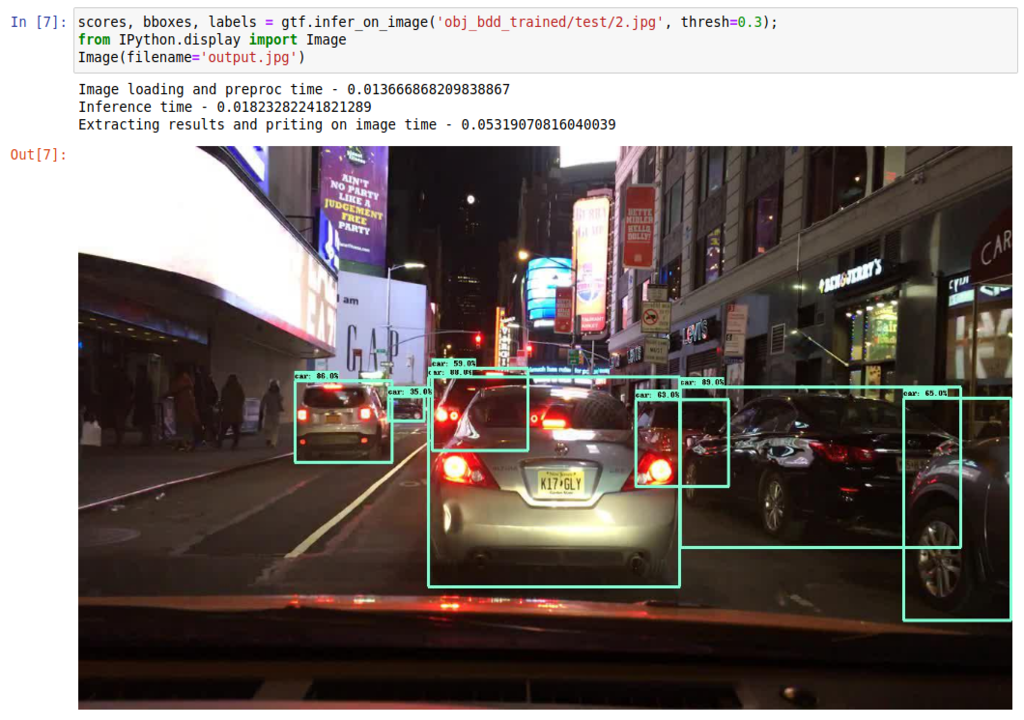
★ Run inference on a single image
★ Run benchmark speed analysis
* Without optimization, these are the results on AWS P3.2x instance
Average Image loading time : 0.0121 sec
Average Inference time     : 0.0347 sec
Result extraction time     : 0.0848 sec
total_repetitions          : 100
total_time                 : 3.4712 sec
images_per_sec             : 28
latency_mean               : 34.7123 ms
latency_median             : 34.9255 ms
latency_min                : 32.2594 ms
Step 6 — Optimize using TensorRT-6
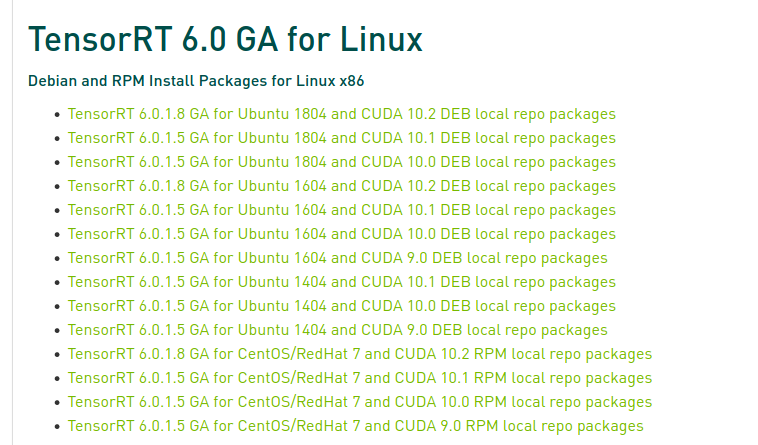
★ Install TensorRT6
* Visit Nvidia TensorRT page to download TRT6
* Download packages from TensorRT website depending upon os and CUDA versions.
★ To optimize using TensorRT run the following command.
* Since it runs a TF engine, running it as a wrapper on jupyter notebook results in system exit.
* For that reason, a script named optimize.py is provided.
* Run it over exported saved_model
Step 7— Inference and speed benchmark after optimization
★ Load the detector
★ Load the trained model
* Load from optimized saved_model
★ Run inference on a single image
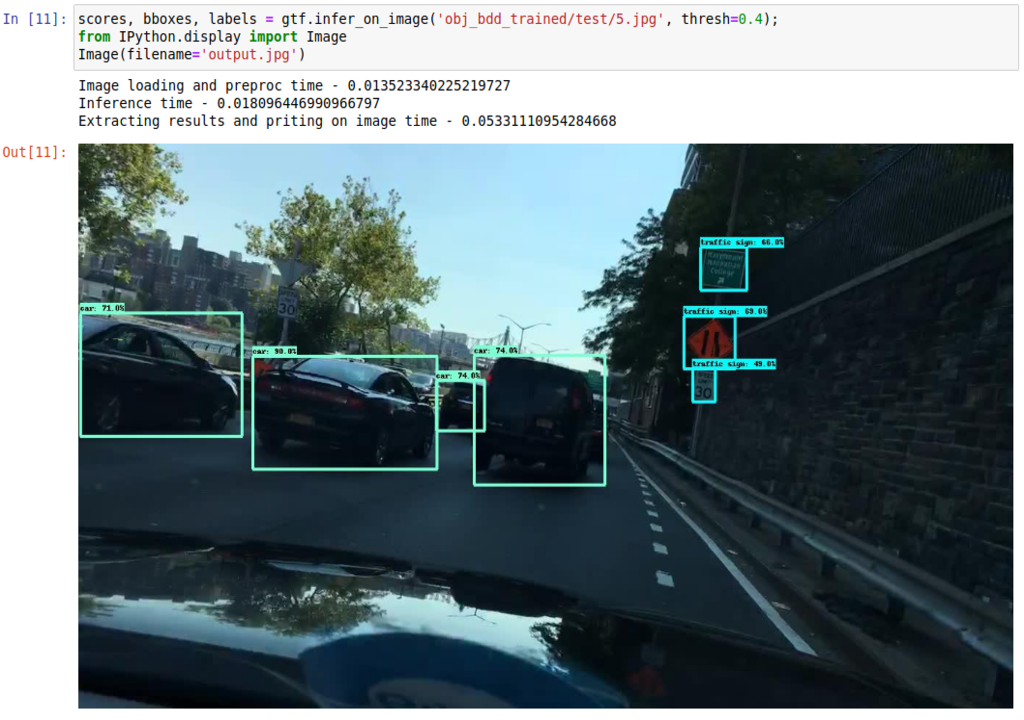
★ Run benchmark speed analysis
* Without optimization, these are the results on AWS P3.2x instance
Average Image loading time : 0.0117 sec
Average Inference time     : 0.0169 sec
Result extraction time     : 0.0822 sec
total_repetitions          : 100
total_time                 : 1.6907 sec
images_per_sec             : 59
latency_mean               : 16.9070 ms
latency_median             : 16.8167 ms
latency_min                : 16.2708 ms
Conclusion
With the Monk Object detection library one can easily
★ convert custom datasets to tf-records
★ update config files using pythonic syntax
★ train the engine and export to different inference formats
★ Infer either using checkpoints or saved model formats
★ Optimize model using TensorRT engines for faster inference
★ Post optimization images processed per second nearly doubled
The entire code is available on GitHub at Monk Object Detection Library
Happy Coding!!
Appendix — 1
More About Monk Object Detection Library
Easing up the process of Tensorflow 2.0 Object Detection API and TensorRT was originally published in Towards AI — Multidisciplinary Science Journal on Medium, where people are continuing the conversation by highlighting and responding to this story.
Published via Towards AI
Towards AI Academy
We Build Enterprise-Grade AI. We'll Teach You to Master It Too.
15 engineers. 100,000+ students. Towards AI Academy teaches what actually survives production.
Start free — no commitment:
→ 6-Day Agentic AI Engineering Email Guide — one practical lesson per day
→ Agents Architecture Cheatsheet — 3 years of architecture decisions in 6 pages
Our courses:
→ AI Engineering Certification — 90+ lessons from project selection to deployed product. The most comprehensive practical LLM course out there.
→ Agent Engineering Course — Hands on with production agent architectures, memory, routing, and eval frameworks — built from real enterprise engagements.
→ AI for Work — Understand, evaluate, and apply AI for complex work tasks.
Note: Article content contains the views of the contributing authors and not Towards AI.
Related posts

![Top 15 Computer Vision Datasets [2026]](https://miro.medium.com/v2/resize:fit:700/1*e9tj4kRR7dH_IV8topwfdw.png "Top 15 Computer Vision Datasets [2026]")

")
Recent Posts


")

