


Machine Learning in the Cloud using Azure ML Studio
Last Updated on December 7, 2020 by Editorial Team
Author(s): Ranganath Venkataraman
Cloud Computing
Model training and deployment for a new Nanodegree from Udacity and Microsoft
After completing a Foundations course launched in July that enrolled~ 10,000 students worldwide, I was one of 300 selected in October for a scholarship to get a Nanodegree. After completing the capstone yesterday and graduating, I’m writing this article to document my experience with the mechanics of AzureML. Here’s the link to my project’s repo.
Context
As evident in my previous posts, my self-taught journey to date focused on building predictors and visualizations using machine learning algorithms with Python. My interface was the Jupyter notebook, and my work lived on my laptop. As I was getting ready to practice and learn deploying models, I started the Nanodegree that — among other concepts — covered the deployment of models in Azure.
How this article is organized
Topics covered in this article about Nanodegree’s Capstone project are:
- Purpose
- Setting up for the project.
- Development — HyperDrive and AutoML
- Deployment
- Conclusions
Throughout this article, I’ll discuss points that were good learning opportunities for my fellow students and me.
Purpose
The capstone project is the culmination of training on various concepts; therefore, it tested our ability to:
- run a HyperDrive experiment to comb through the hyperparameter search space to find settings that maximize the performance of a pre-selected scikit-learn algorithm on a problem of choice
- use AutoML to find the best algorithm that maximizes performance on the aforementioned problem
- deploying the best performing model as an active endpoint that can be queried by anybody — getting the product out of my laptop so anybody can use it
Setting up for the Capstone project
The first step was to select a problem and dataset: I chose the problem of predicting vehicle fuel efficiency with the Auto MPG dataset from the UCI repository. Since I was familiar with this dataset from a prior post, I could focus on the mechanics of Azure’s Machine Learning (ML) Studio.
Microsoft and Udacity provide a virtual machine for the capstone: Standard DS3V2 with 14 GB RAM that can provide up to 4 CPU nodes. After launching a workspace that uses this virtual machine, the next setting-up step is to upload and register the dataset, which currently is a .csv file on my desktop.
Once completed, AzureML provides the user with the necessary code to consume the registered dataset, as seen in Figure 1 below. The line declaring the Experiment is my own and not necessary to consume a registered dataset.
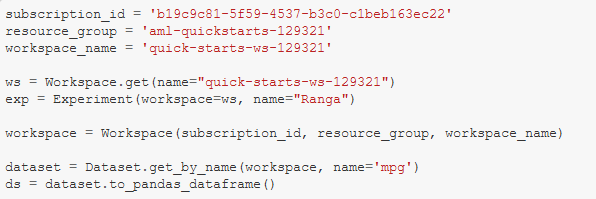
With the dataset ready for use and a workspace launched on a running virtual machine ‘compute,’ we are ready to develop the project.
Development — HyperDrive
Setting up the HyperDrive experiment for this problem in Azure ML Studio entails setting the search space for model hyperparameters — similar to GridSearchCV — and selecting an Early Stopping policy to halt the experiment’s runs upon achieving a certain performance factor. These two factors, along with a max number of trials, provide means of configuring the HyperDrive run, as observed in Figure 2.
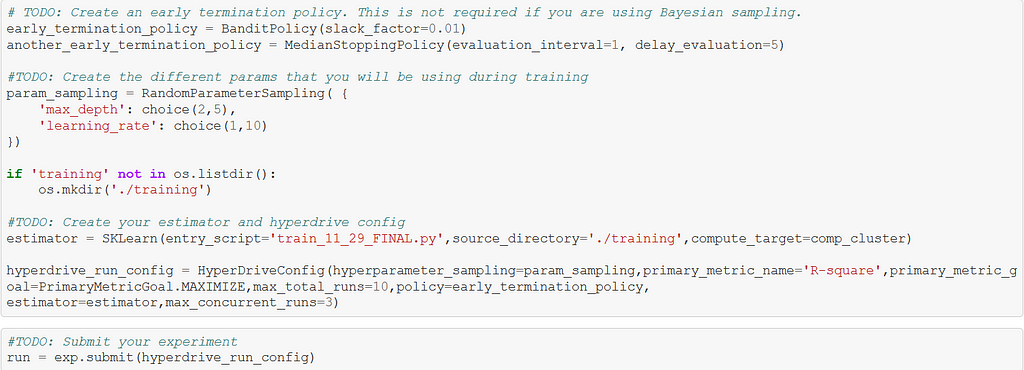
Other settings needed to configure the HyperDrive run include the primary metric name, our goal with the metric, i.e., maximize or minimize, and the estimator. The number of max_concurrent_runs must be less than or equal to the maximum number of nodes that can be provisioned by the available compute, in this case, 3<4.
Continuing with this article’s focus on the mechanics of AzureML, let’s discuss the estimator. As you see above, it’s declared using AzureML’s SKLearn class and uses an entry script as input. That entry script is the actual code that cleans the data, splits data into training and testing sets, trains the pre-selected scikit-learn algorithm, and evaluates performance on a test set. Let’s look at part of the entry script in Figure 3 below, with the whole code available in train_11_29_FINAL.py script, found in the project repo.
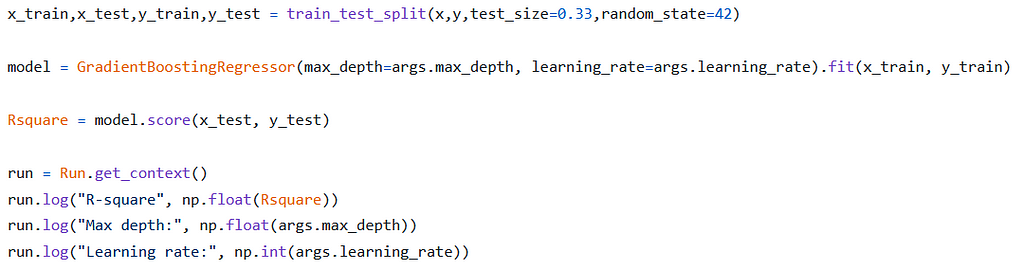
As observed above, I chose to vary tree depth and learning rate when searching for the best model.
I also used the default scorer used by GradientBoosting Regressor, which returns an R-square value. This score must be logged in the entry script with the same name as the name used as the primary_scoring_metric in the HyperDriveConfig — compare Figures 2 and 3.
Experiments are ‘submitted’ to launch HyperDrive runs. When these runs fail, the main console returns messages that can be inadequate for diagnosis. The user opens a given link that has a list of HyperDrive runs, click on a failed run, and open that failed run’s output logs. Those logs point out the specific line with the error.
The best-performing run can then be retrieved from the HyperDrive experiment as seen in Figure 4 below, with the corresponding hyperparameter settings specified in an instance of the algorithm and saved to the active directory as a model using joblib. Figure 5 shows the ID and performance of the best run.
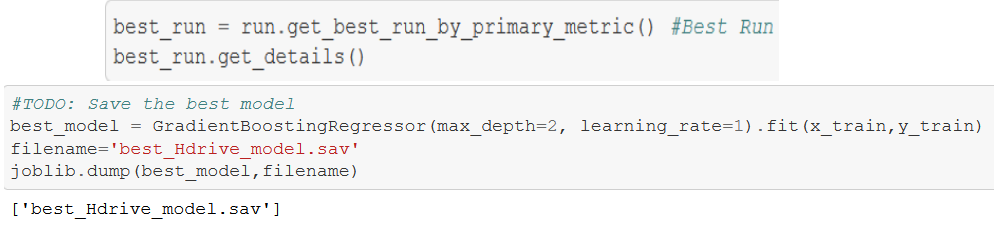
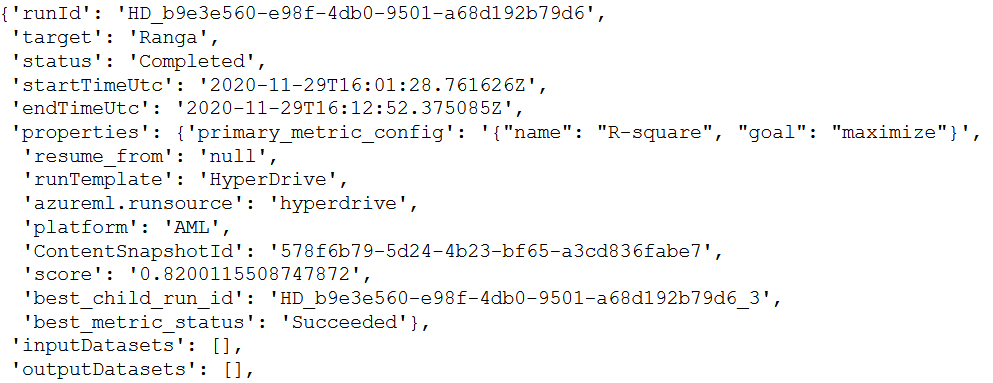
A HyperDrive-optimized GradientBoosting Regressor has an R-squared value of 0.82
Development — AutoML
AutoML in Azure ML Studio entails cleaning the dataset, specifying configuration settings through AutoMLConfig, and submitting an experiment with these settings. Figure 6 below goes through this process — because there is no training script submitted with AutoML, we have to sanitize the data before feeding it as training_data.
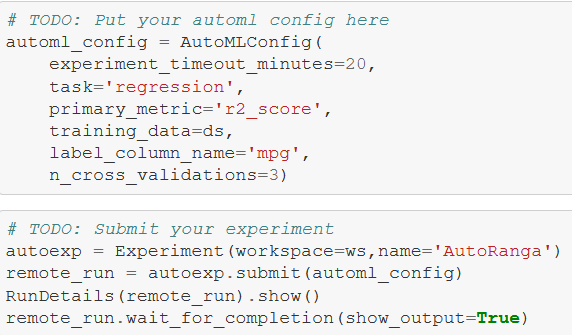
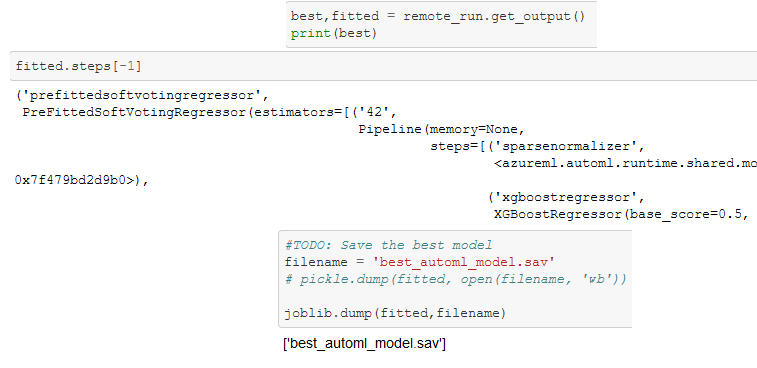
The entire output is in the linked repo — getting the best model from the AutoML experiment reveals that it’s an XGBoost Regressor that produces an R-squared value of 0.87. This top-performing model is saved to the active directory using joblib.dump
Deployment
With the best performing, AutoML saved to the working directory, I then registered the model and created the necessary environment with the required packages to use in deploying the registered model as a web service. This web service is an active HTTP endpoint that can be queried with data to receive the model’s prediction.
Registering the model creates a ‘container’ with the application and libraries/dependencies needed for execution. The registered model is also saved on the working directory for subsequent use in deployment.
The Model class’s deploy method, as used in this project, takes the following inputs: a workspace, the registered model, an inference configuration, and a deployment configuration. Let’s take each of these at a time:
- workspace = already defined earlier
- registered model = covered above
- inference configuration = represents settings of the ‘computer’ used for deployment. The InferenceConfig class is used, which — for our purposes — takes two inputs: an entry script and a curated environment. We’ll cover both of these short
- deployment configurations = configures the web service that hosts the registered model and entry script. For our purposes, we’ll use the Azure Container Instance.
Now let’s discuss the inputs to the InferenceConfig class:
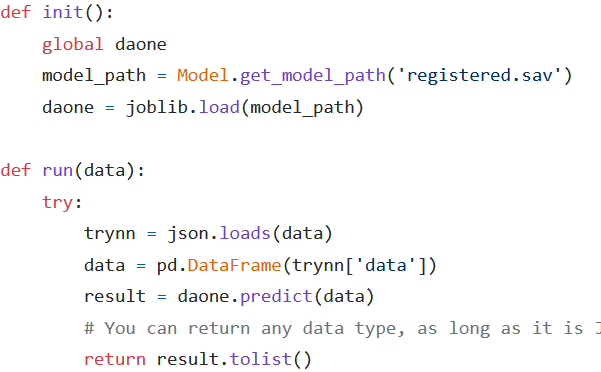
- the entry script takes data from the user and passes it to the model. The resulting prediction from the model is ‘returned’ as the output of the entry script — see below for a snippet from the score.py entry script, which can be found at this project’s repo.
- the curated environment is expected to support the algorithms used by the model. In my case, since the best AutoML model is an XGBoost Regressor, I chose the ‘AzureML-AutoML’ package, which covers this algorithm.
Figure 9 below shows the creation of the environment, inference configuration, and deployment configuration. These creations are fed along with the registered model into the deploy method of the Model class.

As seen below, deployment was successful with a healthy endpoint. Upon my asking, AzureML provides the scoring URI for use in querying the model.
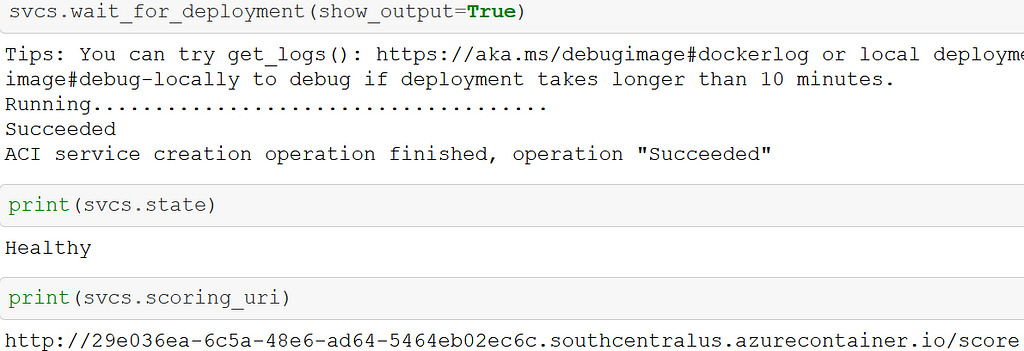
Passing a request to this scoring URI runs the entry script, which launches the registered model from its saved home in the working directory in the init() command. The run() command is then executed to actually generate a prediction on data passed to the active endpoint.
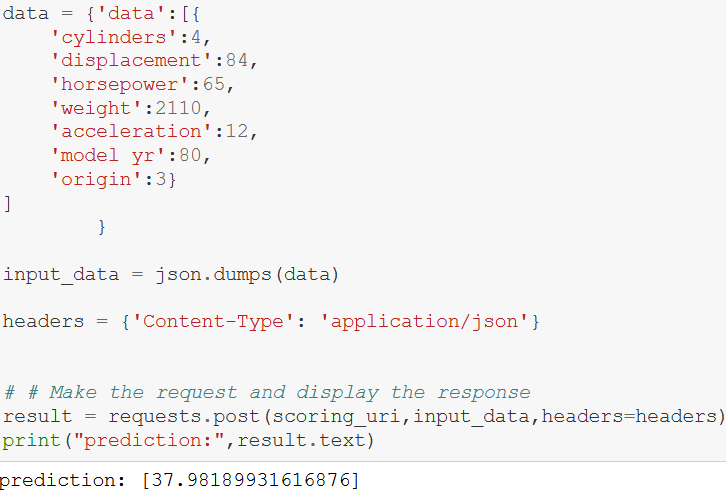
Figure 11 demonstrates that any user who uses the files at the project repo can pass data on a car and get the predicted mileage. Key learning for the group was the importance of passing in a dataframe that can be dumped into a JSON file while being transferred to the score script, which then unpackages, i.e., dumps the JSON file and transfers it back into a dataframe.
Conclusions
I entered this Nanodegree with no experience in deploying models and have come out with experience in one medium. While challenging, this Nanodegree was enjoyable, and I’m looking forward to learning deployment with other tools.
Machine Learning in the Cloud using Azure ML Studio was originally published in Towards AI on Medium, where people are continuing the conversation by highlighting and responding to this story.
Published via Towards AI
Towards AI Academy
We Build Enterprise-Grade AI. We'll Teach You to Master It Too.
15 engineers. 100,000+ students. Towards AI Academy teaches what actually survives production.
Start free — no commitment:
→ 6-Day Agentic AI Engineering Email Guide — one practical lesson per day
→ Agents Architecture Cheatsheet — 3 years of architecture decisions in 6 pages
Our courses:
→ AI Engineering Certification — 90+ lessons from project selection to deployed product. The most comprehensive practical LLM course out there.
→ Agent Engineering Course — Hands on with production agent architectures, memory, routing, and eval frameworks — built from real enterprise engagements.
→ AI for Work — Understand, evaluate, and apply AI for complex work tasks.
Note: Article content contains the views of the contributing authors and not Towards AI.
Related posts


Recent Posts
")


")


