Tf.estimator, a Tensorflow High-level API
Last Updated on July 20, 2023 by Editorial Team
Author(s): Abhinav Prakash
Originally published on Towards AI.

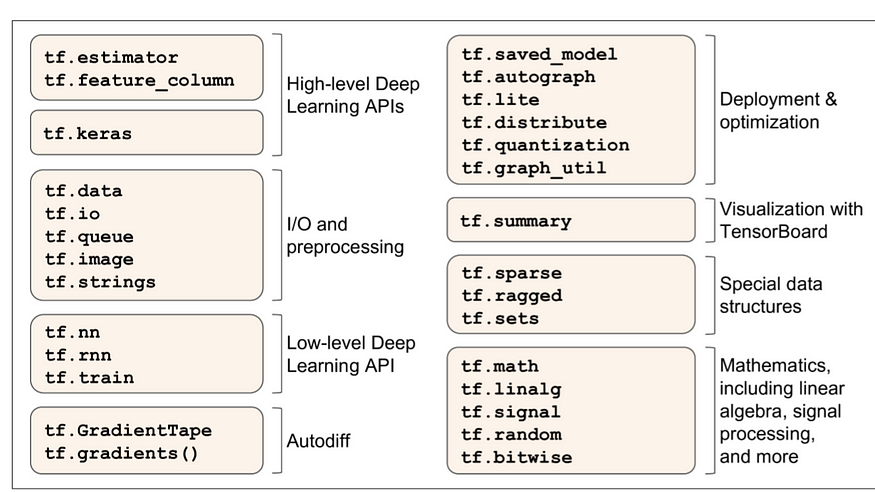
Now Tensorflow 2.0 has been officially released and it’s having two high-level deep learning APIs.
The first one is tf.keras and another one is tf.estimator. You can see the list of TensorFlow’s Python API in the picture above. Some of you are familiar with building an ML model using Keras. But we’re not so familiar with tf.estimator (Assuming we refer to a beginner in ML).
So let us understand tf.estimator.
The context of this article is:
1. Giving you an idea about what tf.estimator is all about.
2.What tasks we’ve to follow while writing the TensorFlow program based on Estimators(pre-made Estimators).
3. Advantages .
4.Estimators capabilities.
5. We’re going to build and test a model by using tf.estimator that classifies iris flowers into there species.
What is tf.estimator?
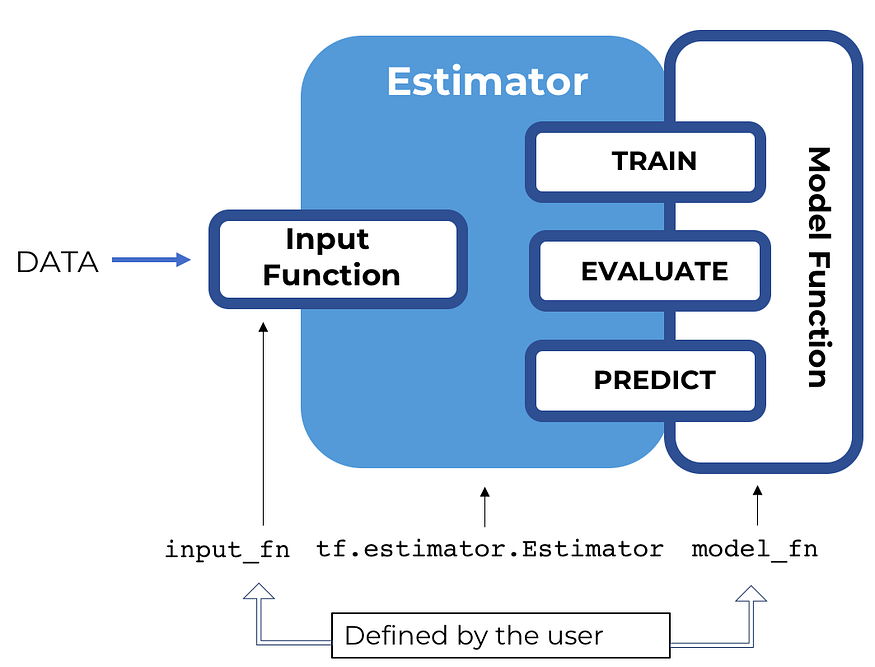
An Estimator is TensorFlow’s high-level representation of a complete model, and it has been designed for easy scaling and asynchronous training. It’s used to train the neural network model and use them to predict new data. It’s a high-level API that sits on top of the low-level core TensorFlow API.
One can use a pre-made estimator or custom estimator.
1. Pre-made Estimators
Pre-made Estimators enable you to work at a much higher conceptual level than the base TensorFlow APIs. You no longer have to worry about creating the computational graph or sessions since Estimators handle all the “plumbing” for you. Furthermore, pre-made Estimators let you experiment with different model architectures by making only minimal code changes. tf.estimator. DNNClassifier, for example, is a pre-made Estimator class that trains classification models based on dense, feed-forward neural networks.
2. Custom estimator
The heart of every Estimator — whether pre-made or custom — is its model function, which is a method that builds graphs for training, evaluation, and prediction. When you are using a pre-made Estimator, someone else has already implemented the model function. When relying on a custom Estimator, you must write the model function yourself.
In this model, we’re mainly dealing with pre-made estimators
Tasks for writing TensorFlow pre-made estimators.

1.Create one or more input functions.
2. Define the model’s feature columns.
3. Instantiate an Estimator, specifying the feature columns and various hyperparameters.
4. Call one or more methods on the Estimator object, passing the appropriate input function as the source of the data.
Later in this article, we’re going to implement the above tasks for iris classification.
Advantages
The tf.estimator provides some capabilities currently still under development for tf.keras.
These are:-
1.We can conduct distributed training across multiple servers with the Estimators API
2.Full TFX integration.
TensorFlow Extended (TFX) is an end-to-end platform for deploying production ML pipelines. The tf.estimator is supported for fully TFX integration.
Estimators capabilities
Estimators provide the following benefits:
- You can run Estimator-based models on a localhost or a distributed multi-server environment without changing your model. Furthermore, you can run Estimator-based models on CPUs, GPUs, or TPUs without recoding your model.
2. Estimators provide a safely distributed training loop that controls how and when to:
(a)load data
(b)handle exceptions
©create checkpoint files and recover from failures
(d)save summaries for TensorBoard
Iris classifier using tf.estimator
We’re going to build an iris classifier using tf.estimator. The dataset we’re using is iris data set which is having four features sepal length, sepal width, petal length & petal width and three labels Setosa, Versicolor & Virginica.
But first, we import all the dependencies
from __future__ import absolute_import, division, print_function, unicode_literals
import tensorflow as tfimport pandas as pd
And then we preprocess the data to perform the following task:-
(a)Create one or more input functions.
(b)Define the model’s feature columns.
(c )Instantiate an Estimator, specifying the feature columns and various hyperparameters.
(d)Call one or more methods on the Estimator object, passing the appropriate input function as the source of the data.
Preprocessing the data
CSV_COLUMN_NAMES = ['SepalLength', 'SepalWidth', 'PetalLength', 'PetalWidth', 'Species']
SPECIES = ['Setosa', 'Versicolor', 'Virginica']
Downloading the data set.
train_path = tf.keras.utils.get_file(
 "iris_training.csv", "https://storage.googleapis.com/download.tensorflow.org/data/iris_training.csv")
test_path = tf.keras.utils.get_file(
 "iris_test.csv", "https://storage.googleapis.com/download.tensorflow.org/data/iris_test.csv")train = pd.read_csv(train_path, names=CSV_COLUMN_NAMES, header=0)
test = pd.read_csv(test_path, names=CSV_COLUMN_NAMES, header=0)
Creating an input function
You must create input functions to supply data for training, evaluating, and prediction.
An input function is a function that returns a tf.data.Dataset object which outputs the following two-element tuple:
features — A Python dictionary in which:
(a)Each key is the name of a feature.
(b)Each value is an array containing all of that feature’s values.
label — An array containing the values of the label for every example.
We’re using pandas for building input pipeline
def input_fn(features, labels, training=True, batch_size=256):
 """An input function for training or evaluating"""
 # Convert the inputs to a Dataset.
 dataset = tf.data.Dataset.from_tensor_slices((dict(features), labels)) # Shuffle and repeat if you are in training mode.
 if training:
 dataset = dataset.shuffle(1000).repeat()

 return dataset.batch(batch_size)
Define the feature columns
A feature column is an object describing how the model should use raw input data from the features dictionary. When you build an Estimator model, we pass it a list of feature columns that describe each of the features you want the model to use. The tf.feature_column module provides many options for representing data to the model.
For Iris, the 4 raw features are numeric values, so we’ll build a list of feature columns to tell the Estimator model to represent each of the four features as 32-bit floating-point values. Therefore, the code to create the feature column is:
# Feature columns describe how to use the input.
my_feature_columns = []
for key in train.keys():
 my_feature_columns.append(tf.feature_column.numeric_column(key=key))
Instantiate an estimator
The Iris problem is a classic classification problem. Fortunately, TensorFlow provides several pre-made classifier Estimators, including:
a. tf.estimator.DNNClassifier for deep models that perform multi-class classification.
b. tf.estimator.DNNLinearCombinedClassifier for wide & deep models.
c. tf.estimator.LinearClassifier for classifiers based on linear models.
For the Iris problem, tf.estimator.DNNClassifier seems like the best choice. Here’s how we instantiated this Estimator:
# Build a DNN with 2 hidden layers with 30 and 10 hidden nodes each.
classifier = tf.estimator.DNNClassifier(
 feature_columns=my_feature_columns,
 # Two hidden layers of 10 nodes each.
 hidden_units=[30, 10],
 # The model must choose between 3 classes.
 n_classes=3)
Train, Evaluate, and Predict
Train the model
Train the model by calling the Estimator’s train method as follows:
# Train the Model.
classifier.train(
 input_fn=lambda: input_fn(train, train_y, training=True),
 steps=5000)
Evaluate
Now that the model has been trained, you can get some statistics on its performance. The following code block evaluates the accuracy of the trained model on the test data:
eval_result = classifier.evaluate(
 input_fn=lambda: input_fn(test, test_y, training=False))print('\nTest set accuracy: {accuracy:0.3f}\n'.format(**eval_result))
After evaluating it we’ll get an accuracy of about 56%
Making predictions (inferring) from the trained model
You now have a trained model that produces good evaluation results. You can now use the trained model to predict the species of an Iris flower based on some unlabeled measurements. As with training and evaluation, you make predictions using a single function call:
# Generate predictions from the model
expected = ['Setosa', 'Versicolor', 'Virginica']
predict_x = {
 'SepalLength': [5.1, 5.9, 6.9],
 'SepalWidth': [3.3, 3.0, 3.1],
 'PetalLength': [1.7, 4.2, 5.4],
 'PetalWidth': [0.5, 1.5, 2.1],
}def input_fn(features, batch_size=256):
 """An input function for prediction."""
 # Convert the inputs to a Dataset without labels.
 return tf.data.Dataset.from_tensor_slices(dict(features)).batch(batch_size)predictions = classifier.predict(
 input_fn=lambda: input_fn(predict_x))
The predict method returns a Python iterable, yielding a dictionary of prediction results for each example. The following code prints a few predictions and their probabilities:
for pred_dict, expec in zip(predictions, expected):
 class_id = pred_dict['class_ids'][0]
 probability = pred_dict['probabilities'][class_id] print('Prediction is "{}" ({:.1f}%), expected "{}"'.format(
 SPECIES[class_id], 100 * probability, expec))
We’ll get an output like this
INFO:tensorflow:Calling model_fn.
INFO:tensorflow:Done calling model_fn.
INFO:tensorflow:Graph was finalized.
INFO:tensorflow:Restoring parameters from /tmp/tmpy5w5zoj8/model.ckpt-5000
INFO:tensorflow:Running local_init_op.
INFO:tensorflow:Done running local_init_op.
Prediction is "Setosa" (73.0%), expected "Setosa"
Prediction is "Virginica" (42.6%), expected "Versicolor"
Prediction is "Virginica" (49.0%), expected "Virginica"
Refrences:- Tensorflow’s official Documentation
Hope you like this article
Do you know what, you can hit the clap button 50 times in medium?
If you like this blog, show some love by doing claps.

Join thousands of data leaders on the AI newsletter. Join over 80,000 subscribers and keep up to date with the latest developments in AI. From research to projects and ideas. If you are building an AI startup, an AI-related product, or a service, we invite you to consider becoming a sponsor.
Published via Towards AI
Take our 90+ lesson From Beginner to Advanced LLM Developer Certification: From choosing a project to deploying a working product this is the most comprehensive and practical LLM course out there!
Towards AI has published Building LLMs for Production—our 470+ page guide to mastering LLMs with practical projects and expert insights!

Discover Your Dream AI Career at Towards AI Jobs
Towards AI has built a jobs board tailored specifically to Machine Learning and Data Science Jobs and Skills. Our software searches for live AI jobs each hour, labels and categorises them and makes them easily searchable. Explore over 40,000 live jobs today with Towards AI Jobs!
Note: Content contains the views of the contributing authors and not Towards AI.


