From Experiments 🧪 to Deployment 🚀: MLflow 101 | Part 02
Last Updated on August 14, 2023 by Editorial Team
Author(s): Afaque Umer
Originally published on Towards AI.
From Experiments U+1F9EA to Deployment U+1F680: MLflow 101 U+007C Part 02
Uplift Your MLOps Journey by crafting a Spam Filter using Streamlit and MLflow

Hello there U+1F44B, and a warm welcome to the second segment of this blog! If you’ve been with us from the beginning, you’d know that in the first part, we crafted a user interface to simplify hyperparameter tuning. Now, let’s pick up where we left off U+26D4 But hey, if you’ve just landed here, no worries! You can catch up by checking out Part 01 of this blog right over here U+1F447
From Experiments U+1F9EA to Deployment U+1F680 : MLflow 101
Uplift Your MLOps Journey by crafting a Spam Filter using Streamlit and MLflow
pub.towardsai.net
Section 2: Experiment U+1F9EA and Observe U+1F50D [Continue…]
Experiment Tracking with MLflow U+1F4CA
Now that our app is ready, let’s proceed to the experiments. For the first experiment, I’ll use the words in their raw form without stemming or lemmatizing, focusing only on stop words and punctuation removal, and applying Bag of Words (BOW) to the text data for text representation. Then, in successive runs, I will fine-tune a few hyperparameters. We’ll name this experiment RawToken.

After running a few runs, we can launch MLflow from the Streamlit UI, and it will appear something like this U+1F447

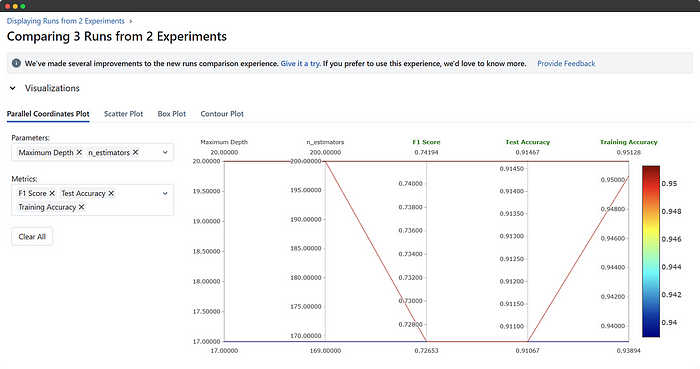
Alright, now we’ve got the RawToken experiment listed under Experiments and a bunch of runs under the Run column, all associated with this experiment. You can pick one, a couple, or all runs and hit the compare button to check out their results side by side. Once inside the compare section, you can select the metrics or parameters you want to compare or visualize.

There’s more to explore than you might expect, and you’ll figure out the best approach once you know what you’re looking for and why!

Alright, we’ve completed one experiment, but it didn’t turn out as expected, and that’s okay! Now, we need to get some results with at least some F1 score to avoid any potential embarrassment. We knew this would happen since we used raw tokens and kept the number of trees and depth quite low. So, let’s dive into a couple of new experiments, one with stemming and the other with lemmatization. Within these experiments, we’ll take shots at different hyperparameters coupled with different text representation techniques.
I won’t go full pro mode here because our purpose is different, and just a friendly reminder that I haven’t implemented Git integration. Tracking experiments with Git could be ideal, but it will require some changes in the code, which I’ve already commented out. MLflow can keep track of Git as well, but adding it would result in a bunch of extra screenshots, and I know you’re a wizard at Git, so I’ll leave it up to you!
Now, let’s manually comment out and uncomment some code to add these two new experiments and record a few runs within them. After going through everything I just said, here are the experiments and their results. Let’s see how it goes! U+1F680U+1F525


Alright, now that we’re done with our experiments, our runs might look a bit messy and chaotic, just like real-life use cases. Can you imagine doing all of this manually? It would be a nightmare, and we’d probably run out of sticky notes or need an endless supply of painkillers! But thanks to MLflow, it’s got us covered and takes care of all the mess from our wild experiments, leaving us with a clean and organized solution. Let’s appreciate the magic of MLflow! U+1F9D9U+2640️U+2728
Selecting Models by Querying Experiment → RunIDU+1F3AF
Alright, let’s say we’re done with a few experiments, and now we need to load a model from a specific experiment and run. The objective is to retrieve the run_id and load the artifacts (the model and vectorizer) associated with that run id. One way to achieve this is by searching for experiments, getting their ids, then searching for runs within those experiments. You can filter the results based on metrics like accuracy and select the run id you need. After that, you can load the artifacts using MLflow functions.

An easier option is to use the MLflow UI directly, where you can compare the results in descending order, take the run id from the topmost result, and repeat the process.

Another straightforward and standard method is deploying models in production, which we’ll cover in the last section of the blog.
My intention behind the first approach was to familiarize you with the experiment query, as sometimes you might require a custom dashboard or plots instead of MLflow’s built-in features. By using the MLflow UI, you can effortlessly create custom visualizations to suit your specific needs. It’s all about exploring different options to make your MLflow journey even more efficient and effective!
Now that we have obtained the run_id, we can load the model and perform predictions through various APIs. MLflow utilizes a specific format called flavors for different libraries. You can also create your own custom flavor, but that’s a separate topic to explore. In any case, when you click on any model in MLflow, it will display instructions on how to load it.
Let’s load one of our models to perform a quick prediction and see how it works in action!

Whoa!! That was smooth! Loading a model from 15 different runs was a breeze. All we had to do was provide the run ID, and there was no need to remember complex paths or anything of that sort. But wait, is that all? How do we serve the models or deploy them? Let’s dive into that in the next section and explore the world of model deployment and serving.
Section 3: Deploying the Model to Production U+1F680
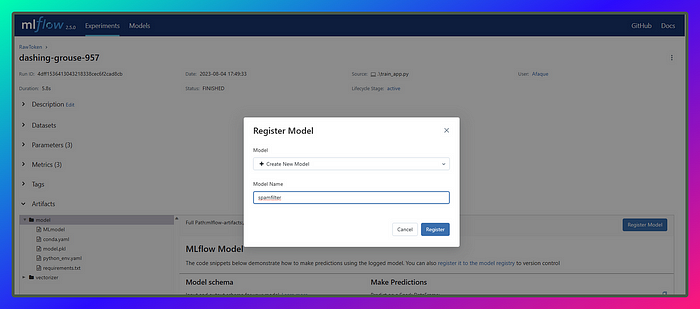
Welcome to the final section! Let’s jump right in without wasting any time. Once we’ve decided on the model we want to use, all that’s left to do is select it and register it with a unique model name. In earlier versions of MLflow, registering a model required a database, but not anymore. Now, it’s much simpler, and I’ll have to write a little less about that.
Registering Best Model U+1F396️
The key point here is to keep the model name simple and unique. This name will be crucial for future tasks like retraining or updating models. Whenever we have a new model resulting from successful experiments with good metrics, we register it with the same name. MLflow automatically logs the model with a new version and keeps updating it.
In this section, let’s register three models based on the test accuracy chart: one at the bottom, one in the middle, and the last one at the top. We’ll name the model spamfilter

Once we register models of different runs under the same model name it will add versions to it like this U+1F447

So, is it the end of the road once we have registered the model? The answer is no! Registering the model is just one step in the machine learning lifecycle, and it’s from here that MLOps, or more specifically, the CI/CD pipeline, comes into play.

Once we have registered the models in MLflow, the next steps typically involve: U+26A0️ Theory Ahead U+26A0️
- Staging and Validation U+1F7E8: It is done before the deployment stage, and the registered model goes through testing and validation. This step ensures that the model performs as expected and meets the required quality standards before it is deployed to production.
- Deployment U+1F7E9: After successful validation, the model is deployed to a production environment or a serving infrastructure. The model becomes accessible to end-users or applications, and it starts serving real-time predictions.
- Monitoring and Maintenance U+26D1️: Once the model is in production, it is essential to monitor its performance regularly. Monitoring helps detect any drift in model performance, data distribution changes, or any issues that may arise during real-world use. Regular maintenance and updates to the model may be required to ensure it continues to deliver accurate results.
- Retraining U+2699️: As new data becomes available, regular model retraining becomes essential to keep it up-to-date and enhance its performance. A recent example is how GPT-4 started showing a decline in performance over time. In such scenarios, MLflow’s Tracking feature proves invaluable by helping you keep track of various model versions. It simplifies model updates and retraining, ensuring your models remain efficient and accurate as your data evolves.
- Model Versioning U+1F522: As we’ve seen earlier, when we register a new model, MLflow automatically versions it. In the case of a retrained or newly trained model, it also undergoes versioning and goes through the staging stage. If the model passes all the necessary checks, it gets staged for production. However, if the model starts performing poorly, MLflow’s model versioning and tracking history come to the rescue. They enable easy rollbacks to previous model versions, allowing us to revert to a more reliable and accurate model if needed. This capability ensures that we can maintain model performance and make adjustments as necessary to provide the best results to our users or applications.
- Feedback Loop and Improvement: Utilizing user feedback and performance monitoring data can lead to continuous improvements in the model. The insights gained from real-world usage allow for iterative refinements and optimizations, ensuring the model evolves to deliver better results over time.
All right then! No more chit-chat and theory jargon!! We’re done with that, and boredom is so not invited to this party. It’s time to unleash the code U+26A1 Let’s get our hands dirty and have some real fun! U+1F680U+1F4BB. Here I’m working solo, I’m not bound by the quality or testing team’s constraints U+1F609. While I don’t fully understand the significance of the yellow stage (Staging for Validation), I’ll take the leap and directly move to the green stage. Though this approach might be risky in a real-world scenario, in my experimental world, I’m willing to take the chance.
So with just a few clicks, I’ll set the stage of my version 3 model to production, and let’s explore how we can query the production model.

Likewise, we can execute a query, and by filtering on the condition current_stage == ‘Production’, we can retrieve the model. Just like we did in the last section, we can use the model.run_id to proceed. It’s all about leveraging what we’ve learned! U+1F4A1

Alternatively, you can also load a production model using the following snippet.

Building a Streamlit UI for User Predictions
Now that our production model is deployed, the next step is to serve it through an API. MLflow provides a default REST API for making predictions using the logged model, but it has limited customization options. To have more control and flexibility, we can use web frameworks like FastAPI or Flask to build custom endpoints.
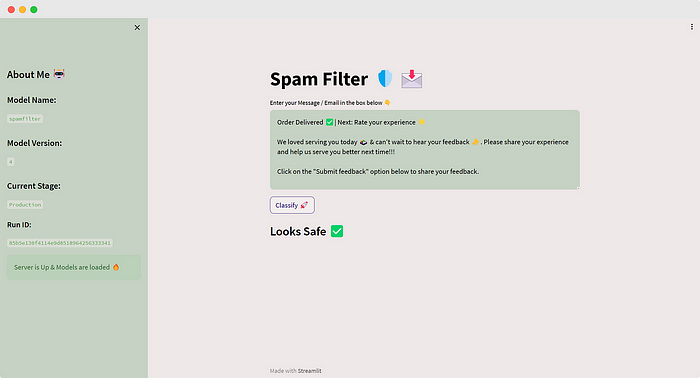
For demonstration purposes, I’ll use Streamlit again to showcase some information about the production models. Additionally, we’ll explore how a new model from an experiment can potentially replace the previous one if it performs better. Here’s the code for User Application named as user_app.py

The app UI will look something like this U+1F60E

Wow, we’ve successfully deployed our first app! But hold on, the journey doesn’t end here. Now that the app is being served to users, they will interact with it using different data, resulting in diverse predictions. These predictions are recorded through various means, such as feedback, ratings, and more. However, as time passes, the model might lose its effectiveness, and that’s when it’s time for retraining.
Retraining involves going back to the initial stage, possibly with new data or algorithms, to improve the model’s performance.

After retraining, we put the new models to the test against the production model, and if they show significant improvement, they’re queued up in the Staging U+1F7E8 area for validation and quality checks.

Once they get the green light, they’re moved to the Production U+1F7E9 stage, replacing the current model in use. The previous production model is then archived ⬛.
Note: We have the flexibility to deploy multiple models simultaneously in production. This means we can offer different models with varying qualities and functionalities, tailored to meet specific subscriptions or requirements. It’s all about customizing the user experience to perfection!
Now, move this latest run to the production stage and refresh our app U+1F504️

It reflects the latest changes, and this is exactly how models are served in the real world. This is the basics of CI/CD — Continuous Integration and Continuous Deployment. This is MLOps. We’ve nailed it from start to finish! U+1F389
And that’s a wrap for this extensive blog! But remember, this is just a tiny step in the vast world of MLOps. The journey ahead involves hosting our app on the cloud, collaborating with others, and serving models through APIs. While I used Streamlit solely in this blog, you have the freedom to explore other options like FastAPI or Flask for building endpoints. You can even combine Streamlit with FastAPI for decoupling and coupling with your preferred pipeline. If you need a refresher, I’ve got you covered with one of my previous blogs that shows how to do just that!
StreamlitU+1F525+ FastAPIU+26A1️- The ingredients you need for your next Data Science Recipe
Streamlit is an open-source, free, all-python framework to rapidly build and share interactive dashboards and web apps…
medium.com
Hey, hey, hey! We’ve reached the finish line, folks! Here’s the GitHub Repo for this whole project U+1F447
GitHub – afaqueumer/mlflow101
Contribute to afaqueumer/mlflow101 development by creating an account on GitHub.
github.com
I hope this blog brought some smiles and knowledge your way. If you had a good time reading it and found it helpful, don’t forget to follow yours truly, Afaque Umer, for more thrilling articles.
Stay tuned for more exciting adventures in the world of Machine Learning and Data Science. I’ll make sure to break down those fancy-sounding terms into easy-peasy concepts.
All right, all right, all right! It’s time to say goodbye U+1F44B
Thanks for reading U+1F64FKeep rockingU+1F918Keep learning U+1F9E0 Keep Sharing U+1F91D and above all Keep experimenting! U+1F9EAU+1F525U+2728U+1F606
Join thousands of data leaders on the AI newsletter. Join over 80,000 subscribers and keep up to date with the latest developments in AI. From research to projects and ideas. If you are building an AI startup, an AI-related product, or a service, we invite you to consider becoming a sponsor.
Published via Towards AI
Take our 90+ lesson From Beginner to Advanced LLM Developer Certification: From choosing a project to deploying a working product this is the most comprehensive and practical LLM course out there!
Towards AI has published Building LLMs for Production—our 470+ page guide to mastering LLMs with practical projects and expert insights!

Discover Your Dream AI Career at Towards AI Jobs
Towards AI has built a jobs board tailored specifically to Machine Learning and Data Science Jobs and Skills. Our software searches for live AI jobs each hour, labels and categorises them and makes them easily searchable. Explore over 40,000 live jobs today with Towards AI Jobs!
Note: Content contains the views of the contributing authors and not Towards AI.


