How to Run Jupyter Notebooks on MacOS Catalina — in Four Steps
Last Updated on July 20, 2023 by Editorial Team
Author(s): Pushkar Pushp
Originally published on Towards AI.
How to Run Jupyter Notebooks on MacOS Catalina — in Four Steps
In my previous blog, I walked you through all steps to run a jupyter notebook. If you’re a data scientist or developer and upgraded to macOS Catalina 10.15, then you might have faced some issues with the jupyter notebook. The latest version of Mac Catalina functionality is different than the previous s version. Follow the below steps to configure and run a jupyter notebook on the latest Catalina version.
There are four easy steps to configure a jupyter notebook.
Step I: Install the anaconda distribution.
The preferable way to go forward is to use a command-line installer instead of a graphic.
Use this link to download CLI https://repo.anaconda.com/archive/Anaconda3-2020.02-MacOSX-x86_64.sh
Once downloaded, go to the terminal and run.
shasum -a 256 /Downloads/Anaconda3-2020.02-MacOSX-x86_64.sh
The next step is to install anaconda with python3, not python2, as it is obsolete in use nowadays.
To start the installation, run below command in your terminal.
bash ~/Downloads/Anaconda3-2020.02-MacOSX-x86_64.sh
Instead of Downloads, use your installation path of anaconda distribution and similarly replace Anaconda3–2020.02-MacOSX-x86_64.sh with your filename.
The screen appears like this,

You need to press Enter here,

Read the license agreement and scroll to the bottom.

Enter yes. Next, it asks for a location to install.

Again Press Enter.
Once you press enter, message props, “Do you wish the installer to initialize Anaconda3 by running conda init?”
Enter Yes
The default shell for Catalina is zsh, so our next step is to install Zsh
Step II: Set-up macOS Terminal with Zsh
For Catalina
First set-up Xcode command-line tools, also known as Xcode-select
xcode-select --install
If there is some issue, try running the below script.
xcode-select — reset
Then you need to install a software package management system for macOS, i.e., Homebrew.
Run the below command.
/usr/bin/ruby -e "$(curl -fsSL https://raw.githubusercontent.com/Homebrew/install/master/install)"
The next step is to install a default shell for Catalina, i.e., zsh.
brew install zsh
brew install zsh
Now we need to integrate zsh in iterm2. If you are not having iterm2, install it using brew.
brew cask install iterm2
For zsh — iterm2 integration ,
sh -c "$(curl -fsSL https://raw.githubusercontent.com/robbyrussell/oh-my-zsh/master/tools/install.sh)"

Step III: Conda, Pip, and Jupyter installation
Use brew to install conda, run below command.
brew cask install miniconda
Update conda to the latest version.
conda update conda
For pip, you can either use conda or easy install.
Conda way
conda install pip
Easy install way
sudo easy_install pip
For nbextensions run following command
conda install -c conda-forge jupyter_contrib_nbextensions
Lastly, for jupyter installation use, brew.
brew install jupyter
Step IV: Creating a Virtual environment and link it to ipykernel
I always prefer to create a virtual environment for my projects to avoid conflict of package dependencies.
To create a virtual environment, pass the name of the environment with the python version to be used. Suppose we want to create an environment named Cat and want to use the Python 3.8.2 version.
Run below command to create the ‘Cat’ environment.
conda create -n Cat python=3.8.2 anaconda
To activate the environment, pass Cat to conda activate.
conda activate Cat
Open a new Zsh window and install ipykernel.
pip install — user ipykernel
The next step is to link the kernel to the virtual environment.
python -m ipykernel install --user --name=Cat
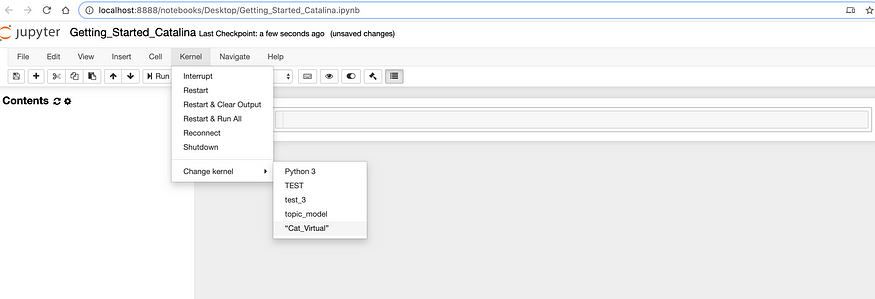
If you want to display the name of the environment, say “Cat_Virtual.”, use below command.
python -m ipykernel install — user — name Cat — display-name “Cat_Virtual”
Go to iterm2 and run.
jupyter notebook
Open any notebook; it appears like this,

Enjoy! U+1F60A
Join thousands of data leaders on the AI newsletter. Join over 80,000 subscribers and keep up to date with the latest developments in AI. From research to projects and ideas. If you are building an AI startup, an AI-related product, or a service, we invite you to consider becoming a sponsor.
Published via Towards AI
Take our 90+ lesson From Beginner to Advanced LLM Developer Certification: From choosing a project to deploying a working product this is the most comprehensive and practical LLM course out there!
Towards AI has published Building LLMs for Production—our 470+ page guide to mastering LLMs with practical projects and expert insights!

Discover Your Dream AI Career at Towards AI Jobs
Towards AI has built a jobs board tailored specifically to Machine Learning and Data Science Jobs and Skills. Our software searches for live AI jobs each hour, labels and categorises them and makes them easily searchable. Explore over 40,000 live jobs today with Towards AI Jobs!
Note: Content contains the views of the contributing authors and not Towards AI.


