Getting Started with Kaggle Competitions Using Monk AI
Last Updated on May 15, 2020 by Editorial Team
Author(s): sinchana S.R
Deep Learning
Monk is a low code deep learning tool and a suitable wrapper for computer vision.
Monk Features
- Low-code.
- Unified wrapper over major deep learning framework s — Keras, PyTorch, gluoncv.
- Syntax invariant wrapper.
Monk Enables
- To create, manage, and version control deep learning experiments.
- To compare experiments across training metrics.
- To quickly find the best hyperparameters.
Goals
- To experiment with Models.
- Understand how easy is it to use Monk.
Table of contents
- About the dataset.
- Installation.
- Importing Pytorch Backend.
- Creating and managing experiments.
- List of all the available models.
- Training a Pneumonia Vs. Normal image classifier.
- Quick mode training.
- Validating the trained classifier.
- Running inference on test images.
About the dataset

License: CC BY 4.0
Paper: http://www.cell.com/cell/fulltext/S0092-8674(18)30154-5
Dataset structure
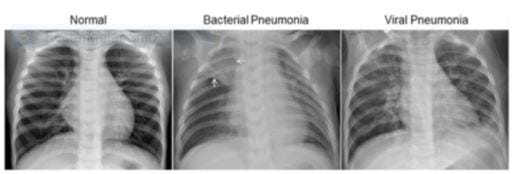
The dataset is organized into three folders (train, test, val) and contains subfolders for each image category (Pneumonia/Normal). There are 5,863 X-Ray images (JPEG) and two categories (Pneumonia/Normal).
Train
-----Normal
-----Pneumonia
Test
-----Normal
-----Pneumonia
Validation
-----Normal
-----Pneumonia
Installation
Setting up MONK and its dependencies:
$ !git clone https://github.com/Tessellate-Imaging/monk_v1.git
$ !cd monk_v1/installation/Misc && pip install -r requirements_kaggle.txt
Since I am using Kaggle, I installed Kaggle dependencies.
If you are Linux user
$ cd monk_v1/installation/Linux && pip install -r requirements_cu9.txt
(Select the requirements file as per OS and CUDA version)
If using Colab install using the commands below
$ cd monk_v1/installation/Misc && pip install -r requirements_colab.txt
If using Kaggle uncomment the following command
$ cd monk_v1/installation/Misc && pip install -r requirements_kaggle.txt
You can find the installation procedure here.
MONK supports PyTorch, Keras, and mxnet-gluon backends.
Importing Pytorch Backend
#Using pytorch backend
$ from pytorch_prototype import prototype
- To use mxnet backend
$ from gluon_prototype import prototype
- To use Keras backend
$ from keras_prototype import prototype
Creating and managing experiments
- Provide a project name
- Provide an experiment name
- For specific data create a single project
- Inside each project, multiple experiments can be created
- Every experiment can have different hyper-parameters attached to it
$ gtf = prototype(verbose=1);
$ gtf.Prototype("PneumoniaClassificationMONK", "UsingPytorchBackend");
This creates files and directories as per the following structure workspace
|
|--------PneumoniaClassificationMONK (Project name can be different)
                |
                |
                |-----UsingPytorchBackend (Experiment name can be different)
                            |
                            |-----experiment-state.json
                            |
                            |-----output
                                    |
                                    |------logs (All training logs and graphs saved here)
                                    |
                                    |------models (all trained models saved here)
List of all the available models
$ gtf.List_Models()
You can also find the list of available models, layers, blocks, optimizers here.
Training a Pneumonia vs. Normal image classifier
Quick mode training
- Using the Default Function
- dataset_path
- model_name
- num_epochs
Dataset folder structure parent_directory
|
|
|------Pneumonia
        |
        |------img1.jpg
        |------img2.jpg
        |------.... (and so on)
|------Normal
        |
        |------img1.jpg
        |------img2.jpg
        |------.... (and so on)
So for quick mode training,
$ gtf.Default(dataset_path="/kaggle/input/chest-xray-pneumonia/chest_xray/train",
            model_name="resnet50",
            freeze_base_network=False,
            num_epochs=25);
You can also find update mode and expert mode training.
Training the classifier
$ gtf.Train();
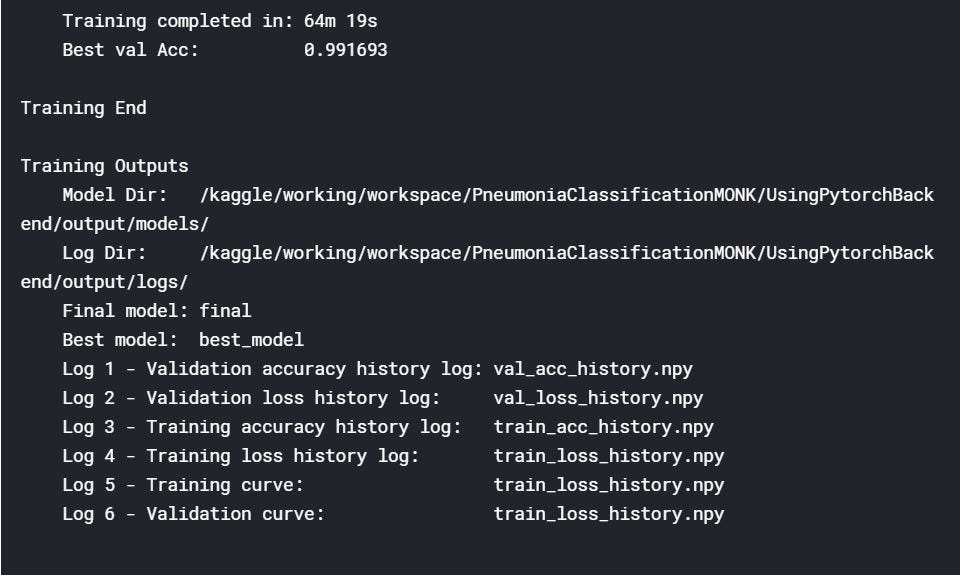
I trained my model for 25 epochs. After the end of the training, you can read the summary:

Validating the trained classifier
Load the experiment in validation mode
- Set flag eval_infer as True
$ gtf = prototype(verbose=1);
$ gtf.Prototype("PneumoniaClassificationMONK", "UsingPytorchBackend",eval_infer=True);
Load the validation dataset
$ gtf.Dataset_Params(dataset_path="/kaggle/input/chest-xray-pneumonia/chest_xray/val");
$ gtf.Dataset();
Run validation
$ accuracy, class_based_accuracy = gtf.Evaluate();
Running inference on test images
Load the experiment in inference mode
- Set flag eval_infer as True
$ gtf = prototype(verbose=1);
$ gtf.Prototype("PneumoniaClassificationMONK", "UsingPytorchBackend",eval_infer=True);
Select image and Run inference
$ img_name = "/kaggle/input/chest-xray-pneumonia/chest_xray/test/NORMAL/IM-0005-0001.jpeg";
$ predictions = gtf.Infer(img_name=img_name);

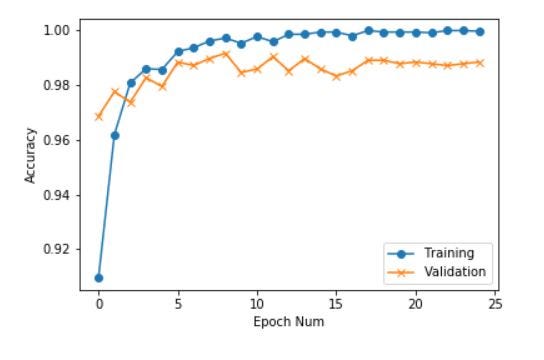
Training v/s Validation Accuracy Curves
$ from IPython.display import Image
$ Image(filename="/kaggle/working/workspace/PneumoniaClassificationMONK/UsingPytorchBackend/output/logs/train_val_accuracy.png")

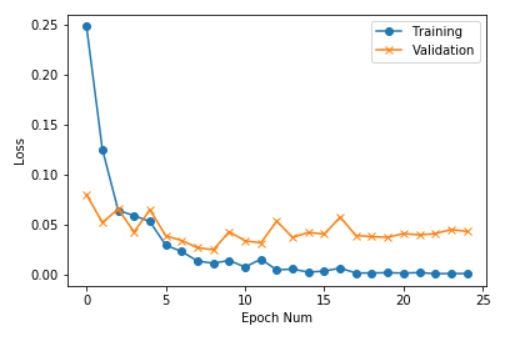
Similarly, we can obtain Training v/s Validation loss Curves.

You can find the starter code on Kaggle’s website.
Resources
A one-stop repository for low-code easily-installable object detection pipelines.
A Graphical User Interface for deep learning and computer vision over Monk Libraries.
A set of jupyter notebooks on PyTorch functions with examples.
I am an open-source contributor to the monk library. If you have any issues, please feel free to open an issue on GitHub.
Getting Started with Kaggle Competitions Using Monk AI was originally published in Towards AI — Multidisciplinary Science Journal on Medium, where people are continuing the conversation by highlighting and responding to this story.
Published via Towards AI
Take our 90+ lesson From Beginner to Advanced LLM Developer Certification: From choosing a project to deploying a working product this is the most comprehensive and practical LLM course out there!
Towards AI has published Building LLMs for Production—our 470+ page guide to mastering LLMs with practical projects and expert insights!

Discover Your Dream AI Career at Towards AI Jobs
Towards AI has built a jobs board tailored specifically to Machine Learning and Data Science Jobs and Skills. Our software searches for live AI jobs each hour, labels and categorises them and makes them easily searchable. Explore over 40,000 live jobs today with Towards AI Jobs!
Note: Content contains the views of the contributing authors and not Towards AI.


