Deploy your Streamlit web app in 5 minutes.
Last Updated on July 24, 2023 by Editorial Team
Author(s): Vaishnavi Seetharama
Originally published on Towards AI.
It has become a need for a data scientist to showcase their work, in a dashboard or a working web app. It is very handy to know the tools available to create a web app. There are many tools available to do the same, such as Dash, Voila, Panel, Streamlit, etc. But my personal favorite is Streamlit.
I have explained how to create a streamlit app in my previous blog . Although it is a very basic/non-ML app, it gives you an idea of how to build a web app for your ML/AI need. Its simplicity explains the whole picture.
If you haven’t read that, I recommend reading it here. Believe me, and it is very easy to create your own app using streamlit. Here I will be showing you how to deploy the application in the streamlit cloud.

You don’t need to have your own webserver to deploy a streamlit web app. You can do that on streamlit cloud if you want to deploy on your own web server. It’s a different process.
To deploy a streamlit app, you need only the following things:
1. Streamlit App Code
2. Requirement.txt file (All these things should be in your GitHub repo)
3. For this, you need a GitHub profile.
4. And anything extra (for my example, I have used images of dice)
How to create GitHub Profile?
Git is a free and open-source software created by Linus Torvalds in 2005. This tool is a version control system that was initially developed to work with several developers on the Linux kernel. GitHub is very widely used to store and share AI/ML-related work.
This story has a detail explanation of how to create a GitHub profile and repository. Thanks to
A beginner’s guide to Git — how to start and create your first repository
You are a developer and you want to start with Git and GitHub? This article is made for you.
medium.com
Where to get Streamlit app Code?
I am providing here the code to create a simple dice roller app to save you time. You can copy the code and save as .py file in your repository or you can also read the details in my previous blog to understand in detail.
import streamlit as st
import random
from matplotlib import pyplot as plt
from PIL import Image

st.markdown("<h1 style='text-align: center;font-size: 62px; color: Blue;'>Dice Roller</h1>", unsafe_allow_html=True)

def make_grid(cols,rows):
 grid = [0]*cols
 for i in range(cols):
 with st.container():
 grid[i] = st.columns(rows)
 return grid

m = st.markdown("""
<style>
div.stButton > button:first-child {
 background-color: #0099ff;
 color:#ffffff;
}
div.stButton > button:hover {
 background-color: #1BAF14;
 color:#ffffff;
 }
</style>""", unsafe_allow_html=True)

mygrid = make_grid(3,3)

no=1

mygrid_1 = make_grid(3,5)
submitted = mygrid_1[2][2].button("Roll the Dice!")
if submitted:
 # Generates a random number
 # between 1 and 6 (including both 1 and 6)
 no = random.randint(1,6)


if no == 1:
 img = Image.open("dice_1.png")
 mygrid[1][1].image(img)

if no == 2:
 img = Image.open("dice_2.png")
 mygrid[1][1].image(img)

if no == 3:
 img = Image.open("dice_3.png")
 mygrid[1][1].image(img)

if no == 4:
 img = Image.open("dice_4.png")
 mygrid[1][1].image(img)

if no == 5:
 img = Image.open("dice_5.png")
 mygrid[1][1].image(img)

if no == 6:
 img = Image.open("dice_6.png")
 mygrid[1][1].image(img)
How to get Requirement.txt file?
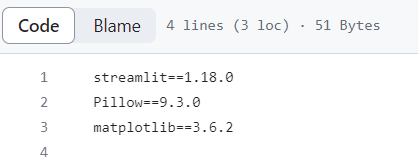
You can type ‘Conda list’ in your anaconda prompt and you will get a list of all the packages installed. You can select a version of those that you have used in building the app. Here, I have used matplotlib, pillow, and streamlit packages. You don't have to provide random. So, your Requirements.txt will look like below.

I have also added a few images. you can download them from here, and you can add them as well in repo.
Your final GitHub repo will look like this

An easier way
You can clone it here to save all your time as well.
Now you are all set to deploy your app.
Deploying the App
You can open share.streamlit.io. log in using your GitHub profile. Then press on the ‘New app’ button

The below fields will open. In the repository field, you can select your GitHub repo. The Branch will get auto-populated; if not, you can select the main/master branch in the repo. The main file Path will be streamlit_dice_roller.py in the example that I am talking about. The app URL will get auto-populated.

After all the fields are filled, you can go ahead and press the ‘Deploy’ button. You will get a page saying, ‘Your app is in the oven,’ as shown below. If you get the below cookies running on your browser, then most probably, your app will be deployed.

Congratulations, your web app is deployed .. it is up and running.. You can share the URL with anyone you like.

Join thousands of data leaders on the AI newsletter. Join over 80,000 subscribers and keep up to date with the latest developments in AI. From research to projects and ideas. If you are building an AI startup, an AI-related product, or a service, we invite you to consider becoming a sponsor.
Published via Towards AI
Take our 90+ lesson From Beginner to Advanced LLM Developer Certification: From choosing a project to deploying a working product this is the most comprehensive and practical LLM course out there!
Towards AI has published Building LLMs for Production—our 470+ page guide to mastering LLMs with practical projects and expert insights!

Discover Your Dream AI Career at Towards AI Jobs
Towards AI has built a jobs board tailored specifically to Machine Learning and Data Science Jobs and Skills. Our software searches for live AI jobs each hour, labels and categorises them and makes them easily searchable. Explore over 40,000 live jobs today with Towards AI Jobs!
Note: Content contains the views of the contributing authors and not Towards AI.


