Logo:
Logo:  Areas Served:
AutoML — A GUI Application to Make ML for Everyone
Last Updated on October 15, 2020 by Editorial Team
Author(s): Lakshmi Narayana Santha
Automated Machine Learning
AutoML — A GUI Application to Make ML for Everyone
A desktop application that automates most of the ML pipeline tasks written in Python.
Machine Learning helps us to automate simple task which needs human intervention. This article explains how I developed a simple AutoML application to automated ML pipelines.
There are plenty of tools and libraries that exist like Google Cloud AutoML, AutoKeras, H2o’s AutoML. But most of these tools are expensive or script-based means don’t provide UI. Normal people who don’t have much knowledge in ML finds it hard to use these tools. So making AutoML with GUI would extend ML usage and helps users to learn ML through interactivity.
Application setup
Download the repository to run locally
$ git clone https://github.com/santhalakshminarayana/AutoML.git
Create Virtual Environment
$ virtualenv AutoML
$ source AutoML/bin/activate
$ cd AutoML
Install requirements to run the application
$ pip install -r requirements.txt
Run application
$ python app.py
If everything is downloaded and got a place in the proper location then you can see a Welcome screen like the top image.
Making a GUI application
I’m not good at UI development and learned only basic HTML, CSS, and JS. And for application backend should be in Python where all computations happen. Now I need a framework or library which allows me to integrate JS and Python. After researching how to make UI in little time with my knowledge I came across Electron which provides the possibility of creating Cross-platform applications but it is heavy. I looked out for an alternative to Electron then found this Python library called Eel (Python library).
Eel creation of desktop applications is easy and doesn’t require learning new packages or libraries if you know basic JS. Eel makes a bridge between JS and Python and passes data from one side to another just like Flask, Django but can run locally as a desktop application depends on the CEF browser (Chrome, Firefox, Edge …).
Architecture of the application
After deciding the tools required and before starting coding designing the base architecture of the application gives an abstract idea of working.
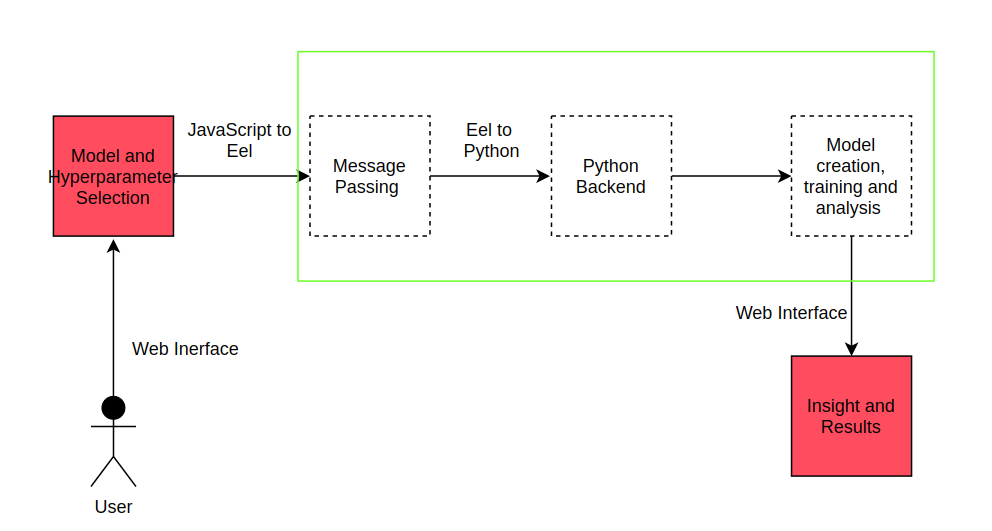
Workflow is simple:
- The user interacts with the application to select a type of model and enters data,
- JS passes data to Python backend with the help of Eel,
- Computation happen in Python and sends data to JS,
- Display results to Users.
The next step is to decide what things should be automated and requirements from the user.
Machine Learning Pipeline
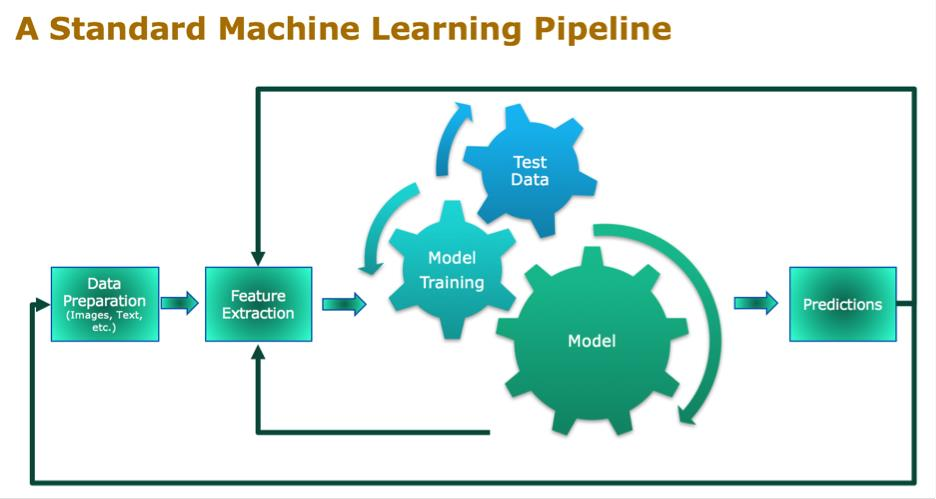
Generally, a Machine Learning model follows pipeline steps like:
- Data extraction / preparation
- Data processing
- Feature extraction
- Model selection
- Model training
- Model tuning
- Model evaluation
- Model prediction
Except for Data extraction, Model Selection, and Model prediction all other steps can be automated by taking data from the user.
So, to automate the above things User has to provide data.
Requirements from User
User interacts with application for entering necessary details and user interaction should be minimal. Expected behaviour from user includes:
- Model selection in the context of dataset
- Providing dataset related to model selected
- Entering parameters for Model tuning
- Look out for model insights and analysis
Detailed end-to-end workflow
Step 1: Model Selection
User has to select the type of Problem from the following types:
- Regression
- Classification
- Clustering
- Anomaly Detection
- Dimension Reduction
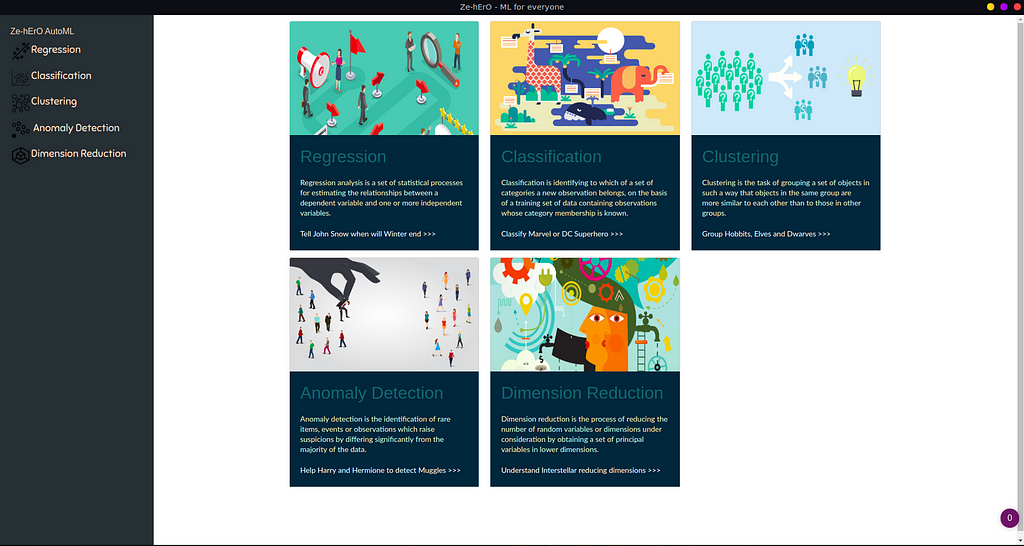
Each Problem type provides different models to select from, like
Regression:
- K-nn
- Linear Regression
- Support Vector Regressor (SVR)
- Random Forest Regressor
Classification:
- K-nn
- Logistic Regression
- Support Vector Machine (SVM)
- Random Forest Classifier
Clustering:
- K-means
- Agglomerative / Hierarchial
- DBSCAN
Anomaly Detection:
- Multivariate Gaussian
- DBSCAN
- Isolation Forest
Dimension Reduction:
- PCA
- TSNE
- Truncated SVD
After selecting the problem type and model user has to provide Dataset and select parameters for the model
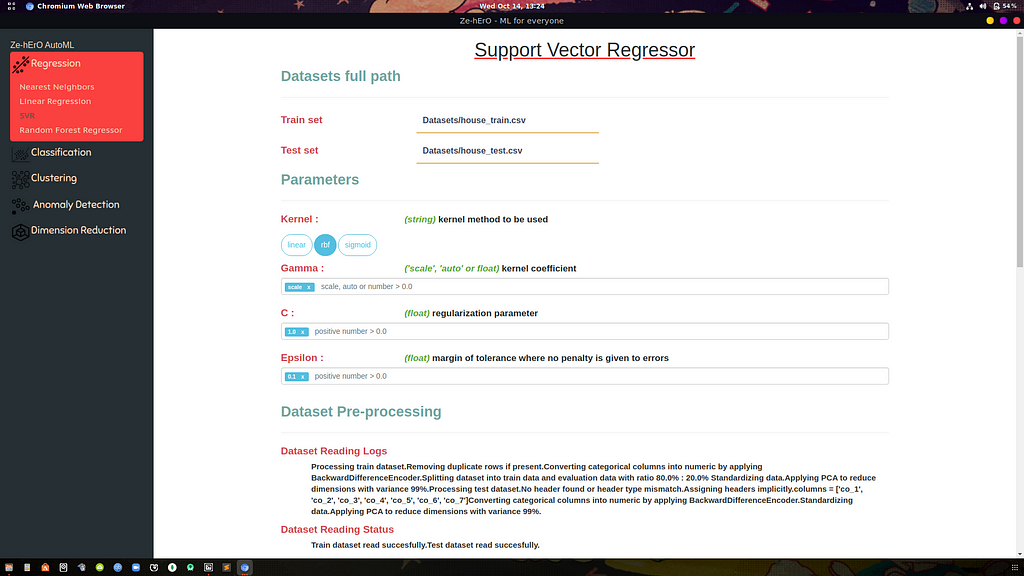
Step 2: Dataset entry and Parameter selection
The user provides Train Dataset and for Supervised learning provides Test Dataset.
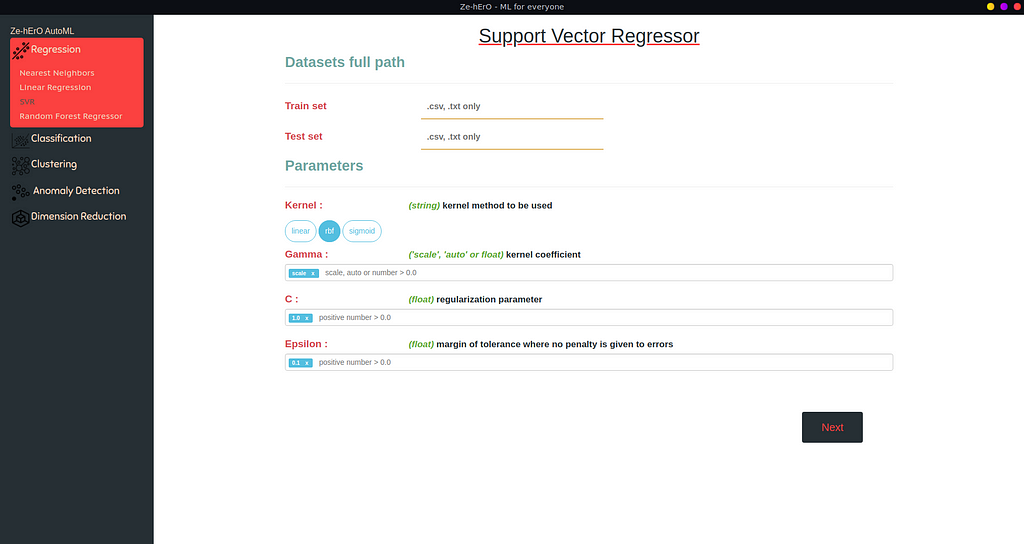
An ML model requires many parameters that differ from model to model. Model parameters could be different types like int, string, float.
If the user wants to run Hyper-parameter tuning, the user can provide multiple values for the same attribute.
If the user doesn’t select any parameters or cleared the default then default values stored will be used as parameters for the Model.
Now, the user interaction is done and it’s time for the backend to take action after the user clicks the Next button.
Step 3: Dataset Pre-processing
Data pre-processing includes
- Checking dataset suitability for Model selected
- Assigning missing column names for each column in the dataset
- Removing duplicate data/rows
- Filling missing values according to problem type — Mean for regression, Mode for classification dataset.
- Converting categorical values to numerical values — used BackwardDifferenceEncoder for conversion
- Splitting into Train and Evaluation datasets if applies
- Standardizing data
- Applying PCA for feature extraction
All these steps are automatically computed and the user will get logs printed in UI.
The user would get an error in the following situations:
- Improper dataset
- Dataset not related for the selected model
- Improper model parameters provided by the user
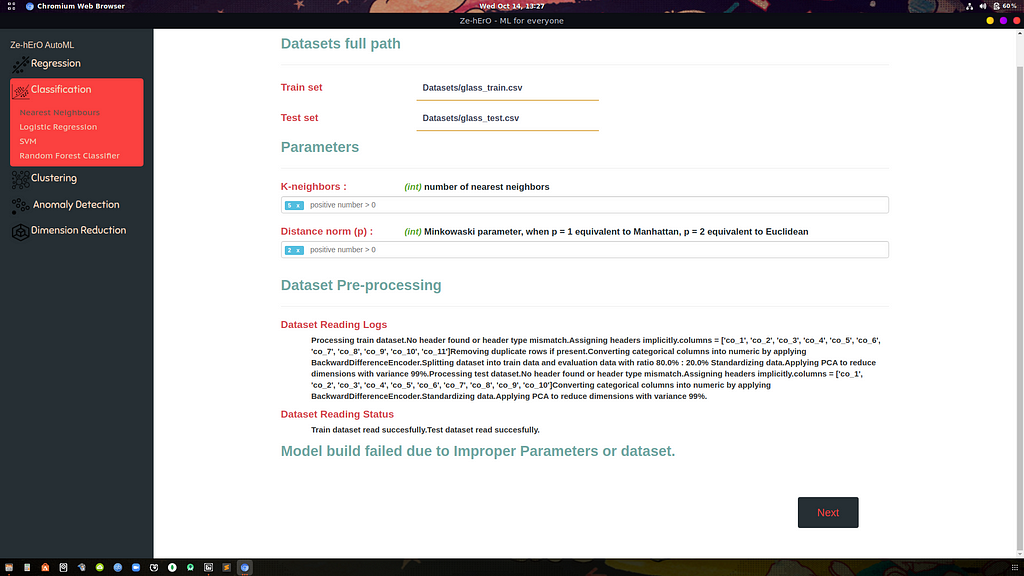
Step 4: Model training with Hyper-parameter tuning
If the dataset provided is successfully processed then the next step is to train Model with dataset. If multiple values for different parameters are provided then the model is Hyper-parameter tuned with GridSearchCV and the best parameter set which gives high accuracy is taken as Model parameters and displayed to the user telling the best parameter set.

If any error occurs then the user informed by logs telling what went wrong in the model building process.
Step 5: Model Performance Evaluation
With data provided from users after splitting into Train data and Eval data, the trained model is evaluated and results are shown to the user in the form of different plots for different problem types.
Regression Evaluation
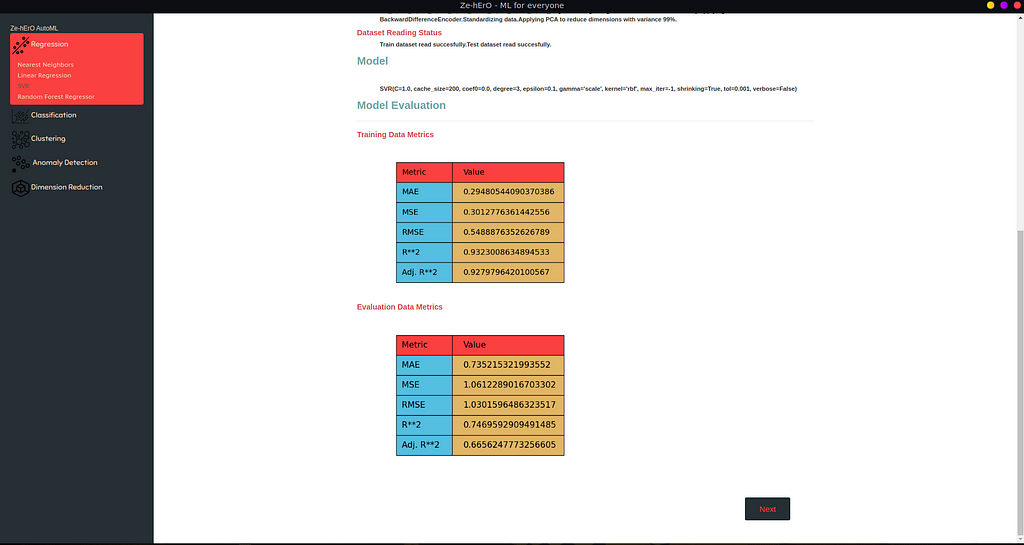
In Regression, the plot contains MAE, MSE, RMSE, R**2, Adj. R**2 metrics on both Training data and Evaluation data shown.
Classification Evaluation
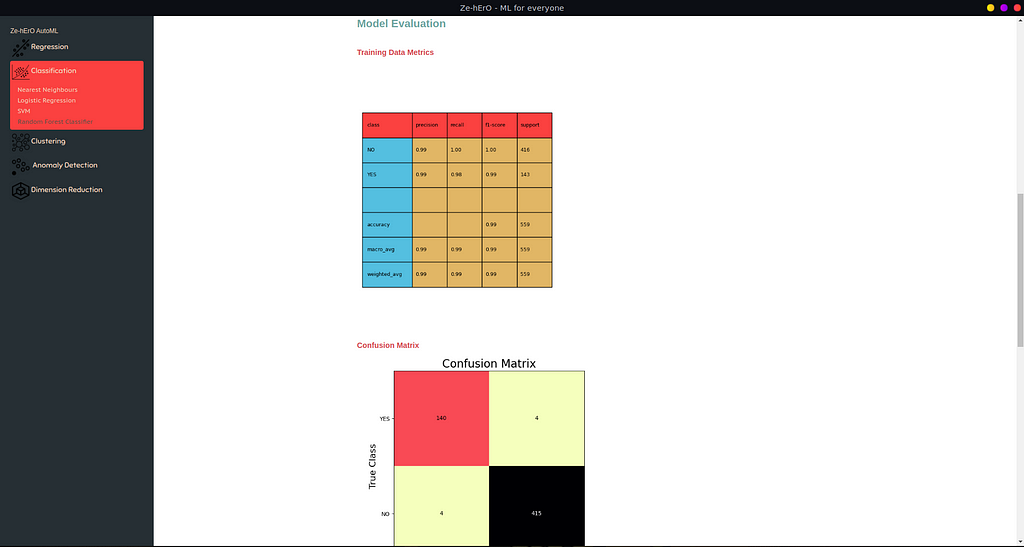
For Classification, Confusion Matrix of classes and Other details like f1_score, accuracy, precision, and recall are shown.
Clustering Predictions
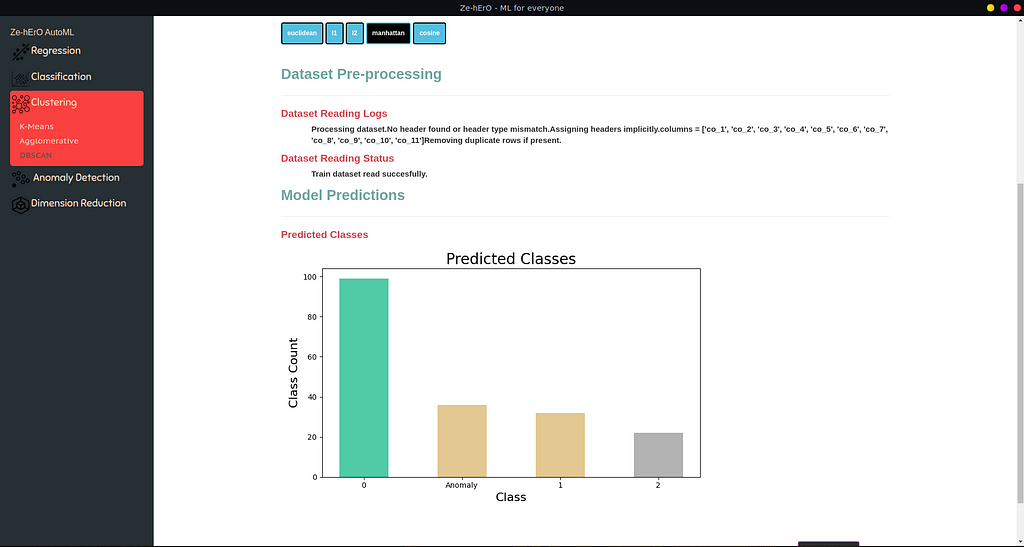
For Clustering, according to the model, a bar chart of the different class count is shown.
Anomaly Detection Predictions
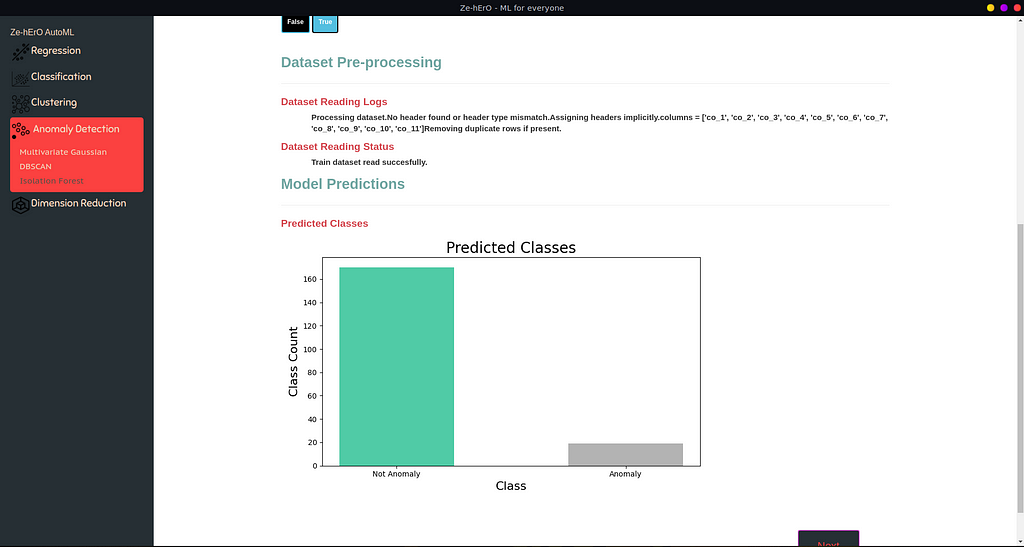
For Anomaly Detection, a bar chart of Anomaly and Not Anomaly count is shown.
Dimension Reduction Performance
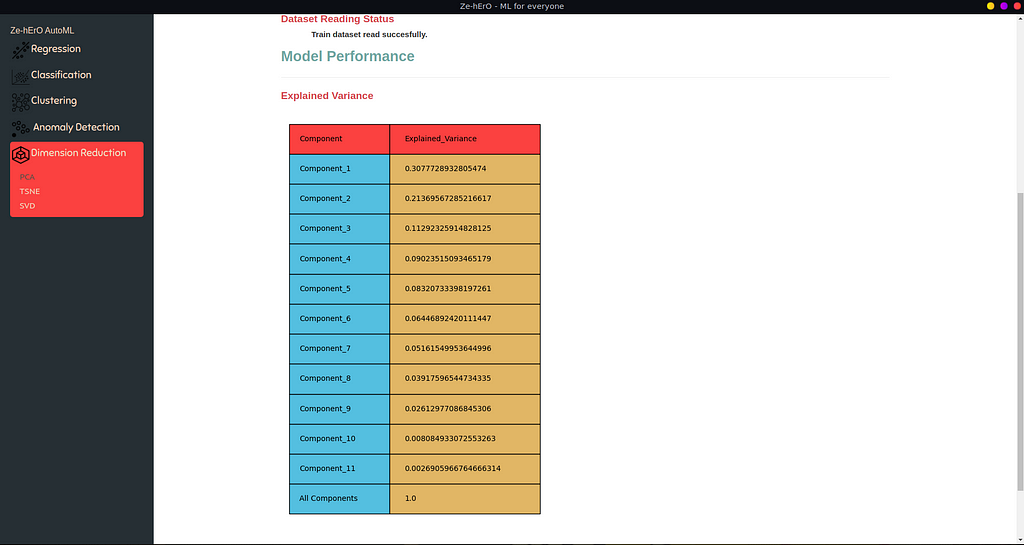
For Dimension Reduction, aggregation of Variance for all components is shown.
Step 6: Result
Based on the problem type, the result is saved as a .csv file.
That’s the end of the show for now. I developed a simple application in view of providing an ML experience for normal users who are working in other domains.
This application can be used
- As a learning tool at beginning of the ML journey
- For a quick understanding of dataset for Data Scientists or ML developers and many more.
Future Improvements
This application can be extended by adding
- Support for Deep Learning
- Web support
- More ML models and types
- Re-design UI for better user experience
AutoML — A GUI Application to Make ML for Everyone was originally published in Towards AI — Multidisciplinary Science Journal on Medium, where people are continuing the conversation by highlighting and responding to this story.
Published via Towards AI
Related posts
Popular posts

 for 2021")


Updates

Recent Posts