Logo:
Logo:  Areas Served:
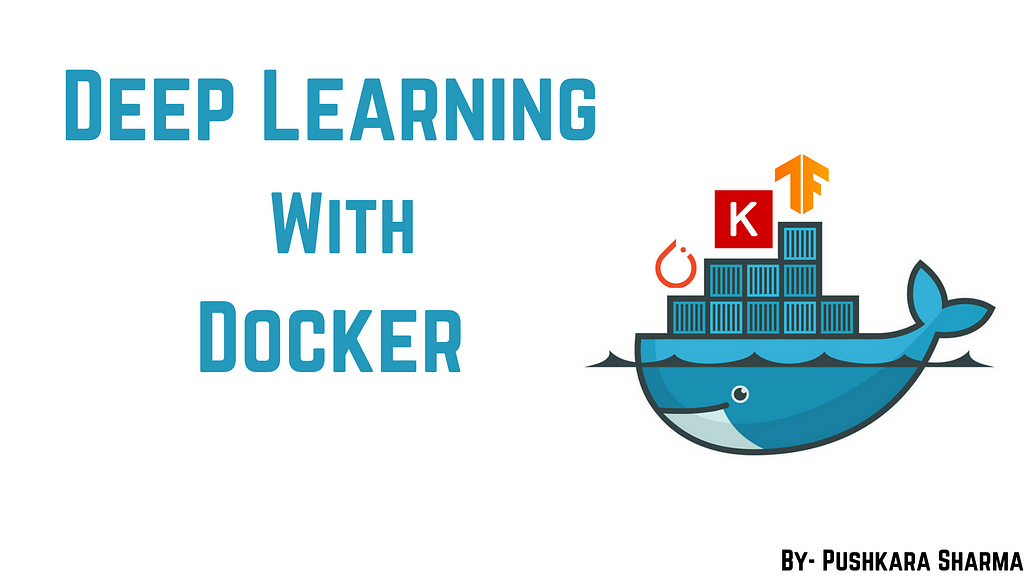
Safest Way To Containerize a Deep Learning Flask API
Last Updated on January 6, 2023 by Editorial Team
Author(s): Pushkara Sharma
Deep Learning, Programming
Building and Pushing a Docker Image of a Deep Learning Flask API in the Safest way possible.
In this article, we will not discuss developing Machine Learning model but rather containerizing our ready to deploy ML API (Flask) with the help of Docker so that there is no hassle that our model is not working in the production environment or while deploying it on cloud or simply sharing the working model to friends and colleagues.
Note:- Docker is kind of useful as well as in trend nowadays so better start containerizing your models.
Firstly, I assume that if you are reading this article you may be already familiar with the Docker. If not, don’t worry I’m still going to define that in my own layman’s terms 😄.
So, What is Docker?
Docker is the tool that allows us to set up the whole OS-level virtualization to develop and share the project in packages known as Docker Images. Then either these images are shared manually(difficult way) or simply push these images on to the DockerHub and pull whenever required.
When these images run on the systems than they are known as Docker containers. So, the container is a running instance of the Docker image. In more layman’s terms, images are considered as classes and containers as objects.
Prerequisites
- I assume that you have already installed Docker in your systems. If not simply follow their official documentation to do so.
- Already developed your Deep Learning or Machine Learning Flask API that is ready for deployment. If not yet, then you can try the one that I have used in this tutorial.
- Stable and fast Internet connection. This seems obvious, but trust me, if the internet is not stable you will get a lot of Error response from the daemon.
Let’s Jump to Task
The following code snippets show my Deep Learning Flask API that produces an abstractive summary of the provided input. I have used Torch and Transformers libraries for the same. The sole purpose to choose this model as an example is to use famous libraries of Deep Learning that may create some problems while making an image(Tensorflow and Keras can also be easily installed). Use pip install package_nameto install the required packages.
Now, before writing commands for the Docker image, we have to create a requirements.txt file to install all required packages in our image. This file can be generated with pip freeze, and those dependencies can then be installed with pip install -r requirements.txt.But in some special cases like torch we have to give a link for downloading that package. In our case, it looked like as follows:-
Flask==1.1.1
transformers==2.11.0
--find-links https://download.pytorch.org/whl/torch_stable.html
torch==1.5.1
For making the docker image of our project, we first have to choose a base image, most of the articles that I follow used alpine for this because it is light-weight but that seems to cause a problem in python and pip installation in my case, that’s why I choose ubuntu(more trusted and comfortable with).
This file should be named as Dockerfile.txt and should be present in the root directory of your project. FROM command will pull the base image that acts as OS for our image. The next command COPY will copy all data to the folder named app. RUN is used to run any command in our docker image. Here we have updated and upgraded our ubuntu and installed python 3 and pip3 to install python packages. Then we have used RUN command to install all dependencies present in requirements.txt (Note:- Here I have used default-timeout=100 in order to avoid waiting for connection type of error). Then we have used WORKDIR to set our working directory that is theapp folder and we have used EXPOSE to informs Docker that the container listens on the port 5000 at runtime. And Finally, to run our program file i.e. flask_api.py automatically whenever the image is initialized we have used CMD that runs default executables.
FROM ubuntu:18.04
COPY . /app
RUN apt update && apt upgrade -y && apt install -y python3 python3-pip
RUN pip3 --no-cache-dir install --default-timeout=100 -r /app/requirements.txt
WORKDIR /app
EXPOSE 5000
CMD python3 /app/flask_api.py
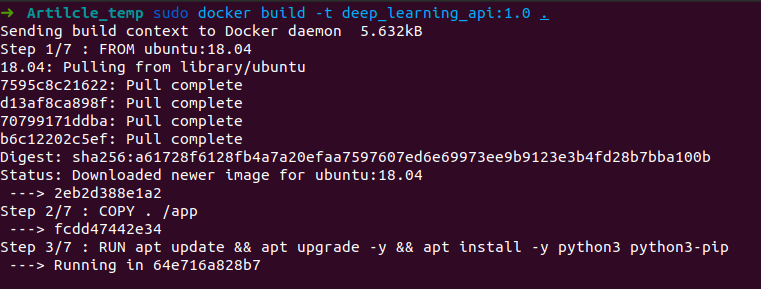
Now, just run the command given below to start building your Docker Image. Here, deep_learning_api is the name of the image, and 1.0 is the tag. Also, remember to copy that dot(.) in the end. 😆
sudo docker build -t deep_learning_api:1.0 .
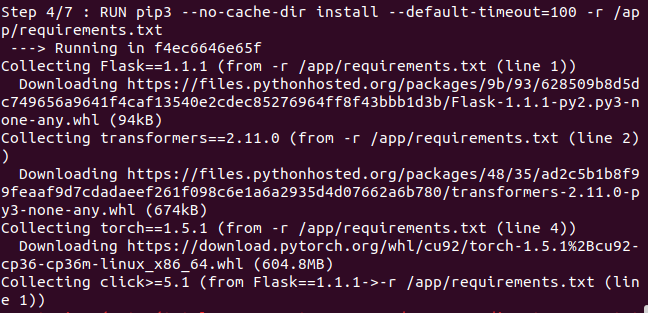
After running this command, relax and see the whole process. If you encounter any network-related error at any stage, just simply restart the whole process. I have attached some of the screenshots of the process for your references.
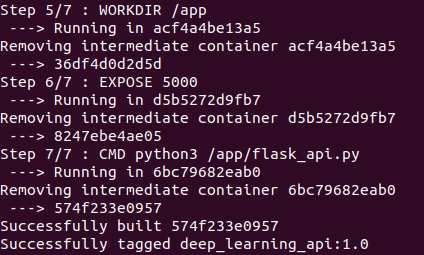
Your Docker Image is successfully built. But is it working correctly? Let's find out. Run the following command to get an image id. Copy the image id of your recently built image. In my case it is 574f233e0957.
sudo docker images
Now to run our Docker container use the following command. If it is working correctly, you will get something like what is shown in the screenshot below.
sudo docker run 574f233e0957

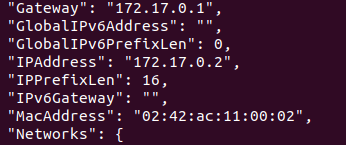
But, if you click on this address nothing will appear. That’s because the IP address of the container is different. So we have to extract that. Open another terminal, and use this command to get the ID of the running container. Copy the Container ID. (Mine was 7c2a2d25bb9d)
sudo docker container ls -la
Now, by running the following command you will get a lot of information about your container, but we are interested in IPAddress. Search for the same and use this instead of 0.0.0.0
sudo docker inspect 7c2a2d25bb9d
Finally, you will see the results in your browser.


OK, so we have built it. But how to share it?
The answer is DockerHub. If you haven’t created your account, create one because it will be very beneficial while working with Docker. After creating the account, create a new Repository. I named it deep_learning_flask_api_demo . Then use sudo docker login on the command line to log in to your docker account.
Then check your Image ID as described before and tag your image with the following command.
sudo docker tag 574f233e0957 yourDockerHubUserName/RepoName:1.0
After tagging simply push it on the DockerHub with the following command.
sudo docker push yourDockerHubUserName/RepoName
From now onwards, you can simply pull your docker image with pullcommand.
Note:- Your repo is public by default and as an unpaid user you get only one private repo.
Hopefully, you have successfully built a Docker image of your Deep Learning Flask API. If you still encounter any kind of error, feel free to contact me. I will be more than happy to help anyone. 😃
The source code is available on GitHub.
Link to my Docker Image.
Thank you for your precious time.😊And I hope you like this tutorial.
Also, check my tutorial on a Logistic Regression From Scratch with Python.
- Logistic Regression from Scratch with Only Python Code
- Gradient Descent v/s Normal Equation For Regression Problems
Safest Way To Containerize a Deep Learning Flask API was originally published in Towards AI — Multidisciplinary Science Journal on Medium, where people are continuing the conversation by highlighting and responding to this story.
Published via Towards AI
Related posts


Popular posts

 for 2021")


Updates

Recent Posts